Easy Strawberry Swirl Ice Cream (No Eggs!)
Enjoy homemade Strawberry Swirl Ice Cream with a creamy buttermilk base and fresh strawberry jam swirls. Quick, natural, and purely delightful! Adapted from Jeni's.
Equipment
- 4-quart Saucepan
- 2-quart saucepan
- Immersion Blender or standing blender or food processor
Ingredients
Strawberry Swirl
- 12 oz Strawberries approximately 1 pint; stems removed and roughly chopped
- ⅓ C Granulated Sugar or brown sugar
- 1 teaspoon Vanilla Extract optional
Ice Cream Base
- 1 ¼ C Heavy Cream divided; or use vegan alternative
- 2 tablespoon Cornstarch or potato starch, tapioca starch
- 3 oz Cream Cheese 6 tablespoons; or vegan alternative
- ½ teaspoon Fine Sea Salt or ¾ teaspoon kosher salt
- ⅔ C Granulated Sugar or brown sugar
- 2 tablespoon Corn Syrup or tapioca syrup, invert sugar
- 2 ½ C Buttermilk or 2% milk, whole milk, or a vegan alternative
- ⅓ C Strawberry Swirl
Instructions
Make Strawberry Swirl
- Add 12 oz Strawberries, ⅓ C Granulated Sugar, and 1 teaspoon Vanilla Extract to a 2-quart saucepan. Simmer over medium heat, stirring often to prevent scorching. It will bubble and be loose at first. Continue to cook until the bubbles are thick and jammy — a spatula drawn across the bottom of the pan should leave a clear trail for a second or two.
- Pour the simmered berry mixture into a wide-mouth mason jar and process with an immersion blender until smooth. Refrigerate until completely cool.
Make Ice Cream Base
- Mix ¼ C Heavy Cream with 2 tablespoon Cornstarch to make a slurry. Set aside.
- In a small bowl, mix 3 oz Cream Cheese (softened) with ½ teaspoon Fine Sea Salt until smooth. Set aside.
- Add remaining 1 C Heavy Cream to a 4-quart saucepan with ⅔ C Granulated Sugar and 2 tablespoon Corn Syrup. Bring to a boil over medium heat, whisking frequently. The cream has a tendency to scorch, so make sure you're getting into the corners!
- Boil the cream mixture for 4 minutes, whisking the whole time.
- Remove the pot from heat, whisk in the cornstarch slurry, then return to a boil, whisking constantly. Cook until the mixture is visibly thickened, about 1 minute.
- Add about ½ cup of the cream mixture to the bowl with the cream cheese. Whisk until smooth and homogenous. Pour the cream cheese mixture into the pot with the remaining base, and whisk until smooth.
- Add 2 ½ C Buttermilk and ⅓ C Strawberry Swirl mixture to the pot, whisk to incorporate, and refrigerate until cool.
Make Ice Cream
- Pour the chilled ice cream base into your ice cream maker and churn according to manufacturer's instructions. When the ice cream is the consistency of soft-serve, you can stop churning.
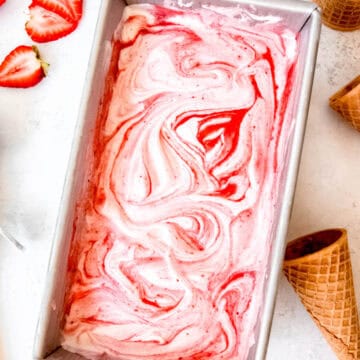
- Working in layers, pack ice cream topped with the strawberry swirl mixture, alternating as you go. Once all ice cream has been packed, use a butter knife to cut the swirls into pretty patterns. NOTE: Feel free to use as much or as little of the strawberry swirl as you like. I've made a batch with all of the strawberry mixture for super bright berry flavor. It's also good with a bit less, and then you can save the extra for serving as a sauce on top of your ice cream or spreading on toast.
- Freeze the packed ice cream in the coldest part of your freezer for 4 hours. Scoop & enjoy!
Notes
Optional Variations
- Vegan/Dairy-Free - Use organic sugar to ensure it isn’t processed with bone char. Swap in your favorite plant-based cream cheese, vegan whipping cream or full-fat canned coconut milk, and full-fat plant milk or buttermilk (e.g. oat, coconut, or soy).
- Corn-Free - Can’t do corn? Potato starch is a perfect 1-to-1 swap. You can also use tapioca starch, but make sure not to bring the ice cream base to a boil if you use it, as the tapioca can become a little thready. Keep it to a low simmer and stir constantly till you achieve the thickened consistency. For the corn syrup, tapioca syrup, invert sugar, liquid glucose, or brown rice syrup are all good 1-to-1 substitutes. Just note that brown rice syrup will add a mild toasty flavor.
- Other Berry Swirl - Who says strawberries are the only summer berry? Try swapping in blueberries, raspberries, boysenberries, blackberries, or even pitted cherries for a fun twist. You can also mix and match!
- Strawberry Rhubarb Ice Cream - For a more spring-inspired swirl ice cream, try replacing half of the strawberries with chopped rhubarb.
- Add Crunch - Broken pieces of ice cream cones, the tail end of your animal crackers, broken graham crackers, or graham cereal are all excellent additions. Aim for about ½ cup or so.
- No Vanilla, Sub Lemon - For a brighter berry flavor, skip the vanilla in favor of fresh lemon juice.
- Different Base - Swirl strawberry jam into any ice cream base you prefer like chocolate, pistachio, or lemon.
- Press a layer of parchment paper directly on top of the ice cream before covering and freezing to help prevent freezer burn.
- Store the ice cream in the coldest part of the freezer, NOT in the door. This will help keep it from melting and refreezing, which causes ice crystals to form. Who wants icy ice cream? Not this gal.
- Homemade ice cream should be eaten within 2 weeks for the best flavor.
Nutrition
Calories: 269kcalCarbohydrates: 30gProtein: 4gFat: 16gSaturated Fat: 10gPolyunsaturated Fat: 1gMonounsaturated Fat: 4gCholesterol: 49mgSodium: 216mgPotassium: 173mgFiber: 1gSugar: 27gVitamin A: 655IUVitamin C: 20mgCalcium: 103mgIron: 0.2mg
Tried this recipe?Let us know how it was!