Do you, like me, love carbs on carbs on carbs? Do you like the idea of making a big batch recipe that can freeze for 6 months and provide you with a host of quick meals for days to come? And would you be pumped if the 12+ meals cost you about $15 total? If you answered yes to all of the above, then this recipe for Caramelized Onion, Potato and Cheese Pierogi is for you.
These tasty Polish dumplings are a family favorite around Christmas, when cozy, rib-sticking dishes are in high demand. I'm not going to lie here - making homemade pierogi from scratch is a time-consuming process, but it's also 100% worth it! Use winter break as an excuse to make this amazingly inexpensive and dazzlingly rustic Eastern European classic.
Jump to:
What Are Pierogi
If you’re unfamiliar with pierogi (pronounced "pyee-ROW-ghee"), they are Polish dumplings and they are delicious. This potato, quatro formaggio and caramelized onion number is my Americanized/Schuering-ized version of the popular pierogi ruskie.
Essentially, the exterior is made from a very simple pasta dough which is then stuffed with the filling, sort of like a large format ravioli. However, unlike ravioli, pierogi are most often served after both boiling and then pan frying in butter. (I told you they're delightful.)
You can fill them with whatever floats your boat; I personally am very fond of potato and cheese pierogi (aka "pierogi ruskie"), especially when they're laced with deeply caramelized onions, a hint of mustardy goodness, and four kinds of cheese.
Why I Love This Polish Pierogi Recipe
While I never made them from scratch until about a year ago, potato and cheese pierogi are perhaps my most nostalgic food. They also happen to be one of the most delectable things I have ever eaten, bar none. I mean, cheesy mashed potatoes + pasta + caramelized onions... what's not to love??
My Mom’s Mom, Babcia (Polish for Grandma) introduced us kids to pierogi when we were very young. “Bop” would serve them at every Christmas dinner, and sometimes, if we were good, we’d get them for snacks when we’d go visit her.
Anyway, while flipping through Good and Cheap*, I saw a recipe for pierogi and decided it was time to try my hand at making them and hopefully do my heritage proud.
While I didn’t follow Leanne’s recipe to a T (partially due to the ingredients I had on hand, and partially due to my memories of how Bop’s used to taste), I owe her a debt of gratitude for inspiring me to take a shot at making them myself. They're SO MUCH BETTER than the ones Mrs. T's slings.
If you have a glut of time on your hands right now and are doing your best to make meals that are delicious and inexpensive, please do yourself a favor and make these. They're cheesy and starchy, creamy and crispy, filled with flavor and quite filling to boot. They’re the bee’s knees.
While the process is pretty time intensive and would benefit from an assembly line (Bop used to make hers with her Polish club friends), I was able to knock the whole recipe out myself in about 4.5 hours. If you have some helpers at home, you could likely finish these faster than I did.
Pro Tip: If you happen to have an empanada press on hand, it'll make stuffing these bad boys a lot faster and easier, especially if you have the kiddos helping.
*Good and Cheap is a cookbook by Leanne Brown designed to inspire delicious meals on the average SNAP (a.k.a. food stamp) budget of $4 per person per day. That’s right, each meal gets about $1.40 of assistance, if you’re trying to eat 3 squares a day. Can you imagine feeding your family on a budget that tight for all of your meals? Leanne Brown could. Best of all, for each copy of her book that is purchased, one is donated to a SNAP family. The recipes are awesomely diverse, use a lot of pantry ingredients, and like the title promises, makes good food cheap. I highly recommend this book to anyone who is looking to slash their food budget while keeping their family nourished and not even remotely culinarily bored.
How to Make Pierogis
Making this recipe for potato and cheese pierogi is definitely more of a weekend project, but once they're assembled and ready to go, they are the best weeknight dinner for cold weather.
Step 1—Caramelize Onions
This step takes quite awhile - upwards of an hour if you want them really nice and dark - but the hardest part is making it through slicing a big pile of onions. *Cue tears.*
I started with 8 Yellow Onions, sliced thinly. In a dutch oven, I melted 3 tablespoons of butter over medium heat until just bubbling, then added the onions and several big pinches of kosher salt.
Stir occasionally, letting the natural sugars of the onions caramelize, first to a lovely golden brown, and then, if you’re patient, to the coveted dark rich hue of cooked bacon. Some recipes also call for brown sugar or balsamic vinegar, but I left mine pretty plain.
This recipe only calls for 2 cups of caramelized onions, but my proportions made about 3 cups worth. There’s a TON of flavor in these onions, and if you’re already going to the trouble of making them for the recipe, make some extra to put on sandwiches, pizzas and flatbreads, to throw into curries or stews, or to top your burgers. They can be frozen in ice cubes for little savory-sweet-umami bombs whenever you need them.
Step 2—Make Pierogi Dough
In a large bowl, combine, AP flour and salt. Make a well in the middle and slowly add in eggs and water.Mix until a smooth dough forms. It will be relatively sticky. Cover the bowl with a clean towel and let rest while you make your filling.
Multi-tasking Tip: You can make the pierogi dough while your onions are caramelizing.
Step 3—Make Filling
Add all filling ingredients to a large mixing bowl and mix until well combined.
Pro Tip: Don't over-mix the potatoes - they have a tendency to get gummy if you do. I'd recommend using a potato masher and a spatula to help you get all the bits hiding in the corners.
Step 4—Assemble
Clean your countertops with a food safe product. Split dough in half, keeping one half covered in the bowl.
Liberally flour your sparkling countertops and place the dough in the center. (I know, I know, my OCD hates that part too. I just cleaned the dang thing and now I’m immediately making it messy?!? But trust me. This will be worth it.)
Using a floured rolling pin, roll dough outwards, spinning frequently to make sure it’s not getting stuck on the counter. Apply more flour to your surface as necessary. The dough should be about ⅛” thick.
Using a roughly 3” biscuit cutter, round cookie cutter, mason jar lid or even a cup, cut as many rounds from your dough as possible, saving the scrap dough to re-roll with the resting half.

Scoop out about a tablespoon of your filling and put it in the center of a round. Fold the dough around the filling, creating a half moon shape. Pinch the edges sealed, being sure to keep the filling inside. Then use a fork to crimp the edges (yes, this makes them pretty, but also ensures that all the good stuff stays where it should).
Lay the completed pierogi on a large plate or cookie sheet, using a tea towel to keep them covered. Don’t make the mistake that I did and lay completed pierogi on top of each other or they will stick together and potentially pull apart all of your hard work. Use parchment or another tea towel to start a new layer as needed.
Repeat steps rolling, filling and crimping until all of your dough is gone.
TIP: If you, like me, have some extra filling left over, toss it in a delitainer, label and date it, and throw it in the freezer. Next time you make pierogi, you have a head start! If I'm feeling lazy, I'll sometimes make "cheater's pierogi" using the leftover filling and some wonton wrappers - no need to boil first.

Step 5—Boil
Bring a large pot of water to boil and add enough salt to make the water taste like the ocean. In batches of about 12, add your pierogi to the boiling water, stirring occasionally, until they rise to the top (1-3 minutes).
Using a slotted spoon or skimmer, remove boiled pierogi and put on another plate or cookie sheet. Continue until all pierogi are boiled.
Make Ahead Tip: Once potato and cheese pierogi are cool, you can portion them out into freezer bags, removing as much air as possible from the bags. Label and date them before freezing. They will easily last 6 months, and you can pan fry them directly from frozen. Don’t freeze the ones you want to eat tonight (or even this week! They’ll stay in the fridge for up to 7 days).

Step 6—Pan Fry & Serve
Heat a medium-large saucepan (depends on how many you’re making) over medium heat. For 12 pierogi, I added in about a tablespoon of butter. When the butter begins to bubble, add your pierogi. Cook until golden brown, then flip and cook until the other side is equally golden and delicious.
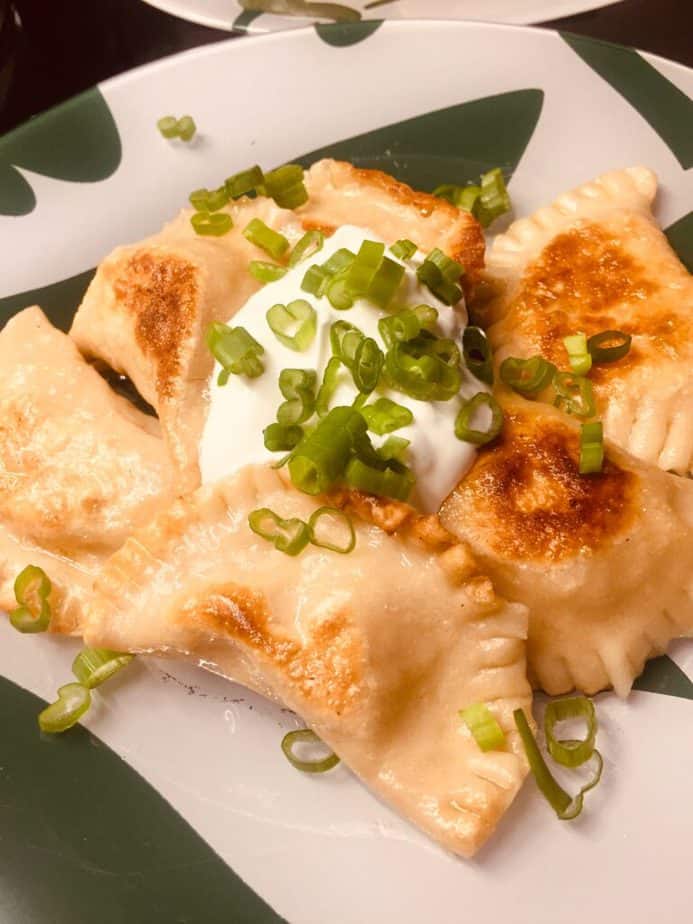
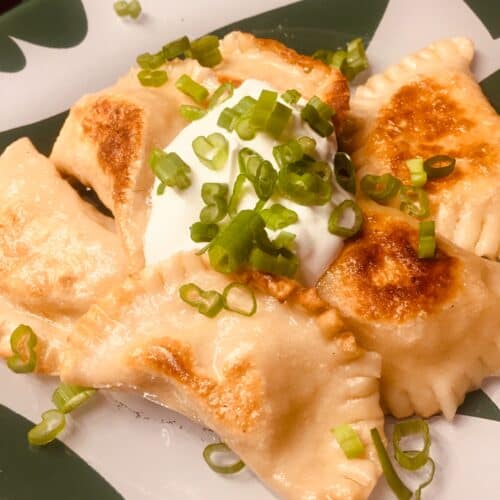
Serve pan-fried potato and cheese pierogi with a drizzle of melted, salted butter, a dollop of greek yogurt (or sour cream, traditionally), and a handful of scallions, chopped. Enjoy every carb-y moment. You earned it.

Alternate Filling Ideas
Caramelized onion, potato and cheese pierogi are my absolute favorite flavor, but don't feel like you have to stop there. Here are some other popular pierogi fillings:
- Sauerkraut (add mushrooms if you like!)
- Sweetened Farmer's Cheese (like you'd put in a blintz)
- Ground Meat & Onion
- Spinach, Potato, Onion & Feta
If you come up with a killer pierogi filling that the world should know about, let me know in the comments below!
Frequently Asked Questions
When I make them, this recipe yields about 72 pierogi, with enough filling leftover for a small delitainer.
If I'm eating pierogi as my main course, 6 usually does the trick. If you're serving as a side on your holiday table, well, that depends - did you wear elastic pants? If so, 2-3 is a good amount. If not, you're doing it wrong; go home and change immediately.
Once the pierogi have been boiled and drained, you can freeze them in a single layer on a sheet pan. Once frozen, pop them into a zip top bag - they'll be good for about 6 months! When you're ready to serve, melt butter in a sauté pan and toss the pierogi in to brown, no need to defrost them first.
If you wanna go full traditional, authentic Polish for your pierogi ruskie, I suggest using twaróg, which is a Polish farmer's cheese. Otherwise, cheddar, fontina, mozzarella, or really any melty cheese (or mix thereof!) will work well here.
More Yummy Tater Recipes


If you made this recipe for my mustardy Potato and Cheese Pierogi with Caramelized Onions, please be sure to rate and review it below!
Potato and Cheese Pierogi with Caramelized Onions
Ingredients
Pierogi Dough
- 4 C AP Flour
- 2 teaspoon Kosher Salt
- 2 Large Eggs room temperature
- 2 C Water lukewarm
Potato, Cheese and Caramelized Onion Filling
- 2 lb Potatoes of Choice peeled and boiled till fork tender
- 2 C Shredded Cheese of Choice (I used TJ's Quattro Fromaggio mix)
- 2 C Caramelized Onions* (see recipe note)
- 2 tablespoon Dijon Mustard (optional)
- 1 teaspoon Dried Thyme (optional)
- 1 teaspoon Cayenne Pepper (optional)
- 1 teaspoon Smoked Hot Paprika (optional)
- 4 Scallions, Chopped (optional)
- Salt and Pepper to taste
Instructions
- In a large bowl, combine, AP flour and salt. Make a well in the middle and slowly add in eggs and water.Mix until a smooth dough forms - it will be relatively sticky. Cover the bowl with a clean towel and let rest while you make your filling.
- In a separate large bowl, combine remaining ingredients.
- Split dough in half, keeping one half covered in the bowl. Liberally flour your sparkling countertops and place the dough in the center. Using a floured rolling pin, roll dough outwards, spinning frequently to make sure it’s not getting stuck on the counter. Apply more flour to your surface as necessary. The dough should be about ⅛” thick.
- Using a roughly 3” biscuit cutter, round cookie cutter, mason jar lid or even a cup, cut as many rounds from your dough as possible, saving the scrap dough to re-roll with the resting half.
- Scoop out about a tablespoon of your filling and put it in the center of a round. Fold the dough around the filling, creating a half moon shape. Pinch the edges sealed, being sure to keep the filling inside. Then use a fork to crimp the edges shut.Lay the completed pierogi on a large plate or cookie sheet, using a tea towel to keep them covered. Don’t make the mistake that I did and lay completed pierogi on top of each other or they will stick together and potentially pull apart all of your hard work. Use parchment or another tea towel to start a new layer as needed.Repeat steps rolling, filling and crimping until all of your dough is gone.
- Bring a large pot of water to boil and add enough salt to make the water taste like the ocean. In batches of about 12, add your pierogi to the boiling water, stirring occasionally, until they rise to the top (1-3 minutes). Using a slotted spoon or skimmer, remove boiled pierogi and put on another plate or cookie sheet. Continue until all pierogi are boiled. Once pierogi are cool, you can portion them out into freezer bags, removing as much air as possible from the bags. Label and date them before freezing. They will easily last 6 months, and you can pan fry them directly from frozen.
- Heat a medium-large saucepan (depending on how many you’re making) over medium heat. For 12 pierogi, I added in about a tablespoon of butter. When the butter begins to bubble, add your pierogi. Cook until golden brown, then flip and cook until the other side is equally golden and delicious.
- Serve with a drizzle of melted, salted butter, a dollop of greek yogurt (or sour cream, traditionally), and a handful of scallions, chopped.Enjoy every carb-y moment. You earned it.
Notes
- Frozen pierogi can last for up to 6 months in the freezer.
- Boiled pierogi will last for about a week in the fridge.
- In order to fully release all of the flavors of your onions, I highly recommend caramelizing them until they are a deep brown. I started with 8 Yellow Onions, sliced thinly. In a dutch oven, I melted 3 tablespoon butter over medium heat until just bubbling, then added the onions and several big pinches of kosher salt. Stir occasionally, letting the natural sugars of the onions caramelize, first to a lovely golden brown, and then, if you’re patient, to the coveted dark rich hue of cooked bacon. (Any leftovers can be frozen for up to 3 months!)


Jim featherspoon says
This looks delicious! Can’t wait to try it
Norma Supel says
My husband's mom used to make cottage cheese and caramelized onions pirogi.
I grew up on potato/cheese pirogi.
I just made the cottage cheese with the onions and he LOVED them!
Ash, The Grocery Addict says
Norma, I love that!! I'll have to add some cottage cheese to mine next time. 💛