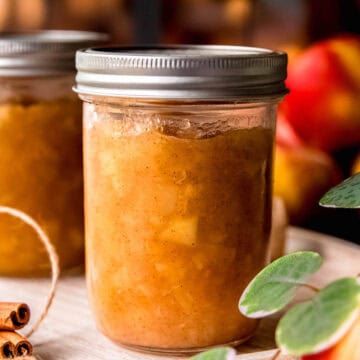
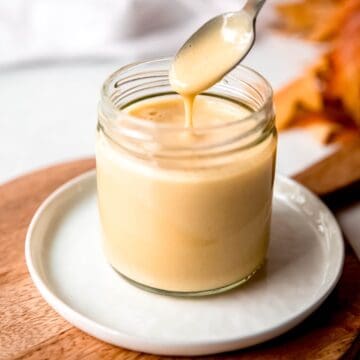
My ridiculously easy recipe for Spiced Apple Butter recipe is made with very little prep and doesn't require peeling the apples before cooking. This jammy, spoonable fruit spread has a caramel-y, concentrated apple taste punctuated by cozy spices like cinnamon, nutmeg and ginger, can be made in an Instant Pot or Crockpot, and is perfect for canning!

This easy slow cooker apple butter recipe tastes like autumn in a jar. It also just so happens to be an excellent way to repurpose any mealy, shriveled, bruised or otherwise subpar apples lurking in your fruit bowl. Better yet, you can easily can it in a water bath to enjoy your bounty all year long.
Have you ever grabbed a bag of apples because they were on sale, and then they were not yummy at all? Or have you accidentally gone overboard apple picking and now have a bowl of shriveled, sad looking apples? I know I’m not the only one that has made one of these budget-busting blunders. And I know what a bummer any of these mistakes can be.
Well, not to fret. I have found the absolute BEST way to use up the sad fall fruit that would otherwise be doomed for the compost pile. This Instant Pot apple butter recipe is a snap to make, plus it can be made with any variety of apples, scaled to however many extra apples you need to use and is a great way to repurpose the fruit you wouldn't otherwise eat.
And the best part?? You don't even have to peel the apples! Simply chop them up into small pieces, dump them in your slow cooker or Instapot with the sugar and spices, give ‘em a stir, then set it and forget it. Half a day later, you'll have a big batch of soft, spreadable, deeply spiced apple butter that tastes like a concentrated version of cinnamon apple preserves.
So come on and meet me in the kitchen with your tired, your poor, your bruised apples—the wretched refuse of your fruit bowl. We're gonna make something really beautiful happen.

Jump to:
- Why You’ll Love Homemade Apple Butter
- Ingredients & Substitutions
- How to Make Apple Butter
- How to Can Apple Butter
- Optional Variations & Dietary Adaptations
- Expert Tips & Serving Suggestions
- Serving Suggestions
- Storage Instructions
- FAQs
- More Apple-Centric Recipes
- No-Peel Apple Butter for Canning (Instant Pot or Crockpot)
- 💬 Reviews
Why You’ll Love Homemade Apple Butter
TL;DR? This amazingly cozy, no-peel Instant Pot apple butter recipe is:
- Quick & Easy. Your only prep is to wash, core, and chop the apples—this is a NO PEEL apple butter recipe for canning! Toss everything in the Instant Pot or slow cooker and let the device do all the heavy lifting for you. Then, when you’re done, feel free to put it up for the season using the easiest canning method around.
- Super Versatile. Homemade apple butter is great on everything from breakfast to cheese plates, dinner to dessert! Read on below for lots of ideas on how to use it.
- Made With Only 10 (Mostly Pantry) Ingredients. Apples, an orange, sugar, and spices are all you need to make this silky smooth apple butter.
- Budget-Friendly. When apples are in season, a big batch of this homemade fruit preserve won't run more than about $5. It's also a great way to use up apples that you wouldn't want to eat out of hand!
Ingredients & Substitutions
As promised, you only need 10 simple ingredients to make my no-peel apple butter in the crockpot. Here's what to grab:

- Apples - Any type of apple (or mix of apple varieties) will do! You can even use ones that are a little wrinkled or bruised so long as you remove any rotten parts. If you plan on canning, I recommend using at least a few tart apples (e.g. granny smith) to increase the acidity.
- Orange - Adding citrus zest and juice brings a welcome bit of brightness. The acidity from the orange juice is also necessary for food safety if you decide to can the apple butter when you’re done.
- Light or Dark Brown Sugar & Granulated Sugar - I used a combination so the caramelly taste of molasses didn’t overpower the fruit, but you could easily use just one or the other. You can also swap in unrefined sugar like jaggery or piloncillo for a more pronounced molasses undertone.
- Ground Cinnamon* - If you don't have ground, use cinnamon sticks. Just be sure to remove them before blending. You can also use 2-3 drops of food-grade cinnamon essential oil if you prefer.
- Ginger* - Ground ginger is always in my spice cabinet, but you're also welcome to use fresh. Note that you’ll need a heckuva lot more fresh to get the same spicy potency as ground—I’d recommend using at least 4x as much. Just be sure to peel off the papery skin and grate it before tossing it in the pot.
- Nutmeg, Clove, & Allspice* - If you can, spring for whole spices. Grate the nutmeg with a microplane and blitz the clove/allspice in a spice grinder or crush them with a mortar and pestle. The flavor will be much more potent. As a bonus, whole spices last indefinitely while ground spices should be replaced after about a year.
- Vanilla - Swirling in a little vanilla at the end will give these apple preserves some serious depth of flavor. Feel free to swap in vanilla paste or powder if that's what you have on hand. You can also get fancy and add the seeds of a vanilla pod. Just save the pod (they're expensive!) to make some vanilla sugar, vanilla extract, or vanilla syrup before you toss it.
*Cinnamon, ginger, nutmeg, clove, and allspice are used to make pumpkin pie spice and apple pie spice; feel free to swap in an equal amount of either of these blends to cut down on the number of bottles you get out of the cabinet.
How to Make Apple Butter
Making no-peel spiced apple butter in the Instant Pot or slow cooker couldn't be easier. Here's how it's done:
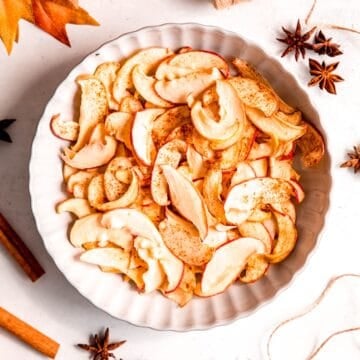
Step 1: Prep Ingredients. Wash & chop apples. Add all the ingredients (except for vanilla extract) to the Instant Pot or Crock Pot.
Step 2: Cook, Covered. Cook (using the slow cooker function if using the Instant Pot) for 10 hours on low heat.
Step 3: Blend the contents of the pot using an immersion blender. (If you don't have a stick blender, feel free to use a regular blender, food processor or food mill.)
Step 4: Thicken by continuing to cook another 2 hours on low, uncovered. Add vanilla extract, stir to combine, then store or can as desired.


How to Can Apple Butter
These canning instructions are in line with the University of Georgia's National Center for Home Food Preservation. If this is your first time canning, I recommend reading their home canning primer and water bath canning guide.
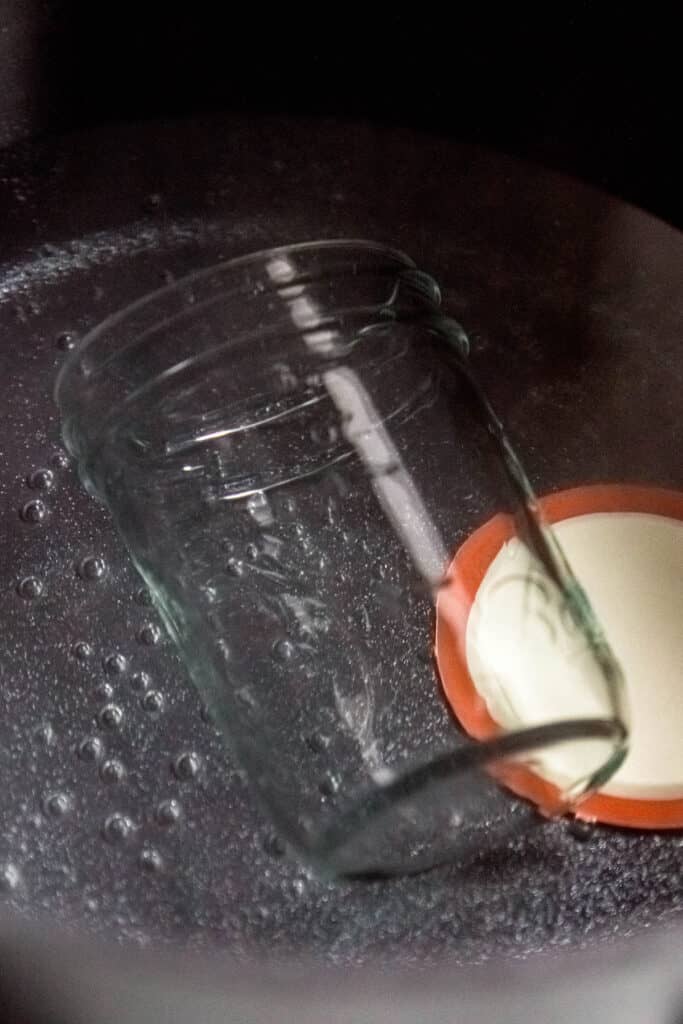
Step 1: Sterilize. While the apple butter is in the last 20 minutes of cooking, sterilize your mason jars and lids by boiling in a large water bath (large pot filled with water) for 10 minutes over medium-high heat. Carefully remove the sterilized hot jars and lids to a clean kitchen towel to dry.
Step 2: Fill. Spoon the hot apple butter into your sterilized jars, leaving ½ inch headspace at the top of the jar. Place the lids on and tighten.
Step 3: Process. Lower the cans into the water bath, bring to a full rolling boil, and process for 15-25 minutes. (Shorter times are appropriate for locations closer to sea level. Longer times are appropriate for larger jars or at altitude. You'll know if they processed long enough if the jar snaps shut during cooling.) Remove the water bath from heat and allow the cans to rest in the water for 5 more minutes.
Step 4: Cool & Label. Remove the jars from the water to a clean kitchen towel, lid sides up. Using another clean kitchen towel, test to make sure the lids are fully tightened. Allow to rest undisturbed at room temperature for 8-12 hours. When the jars are dry and cool, label with the date and contents before storing.


Important Canning Safety Note: The mason jar lids should suck in and create a vacuum seal during the cooling process—you’ll start hearing loud snaps in the kitchen after about an hour or two. (It’s alarming if you’re not expecting it!) If any don't pop in, unscrew the ring top and lightly press the lid to see if it will stick. If not, you can either process in the water bath again (this time increase how long you leave them in), or keep them in the fridge or freezer.
Optional Variations & Dietary Adaptations
- Different Spices - Apples pair well with many different herbs and spices, so you’re welcome to shake things up. I love cardamom, star anise, mace, chai masala, and even thyme! Feel free to mix and match to find your favorite blend.
- Extra Speedy - While using the slow cooking method is my personal preference (I think it gives all the flavors more time to meld and deepen), you can make pressure cooker apple butter in a fraction of the time with an Instant Pot. Simply add all the ingredients (except the vanilla) to the insert, secure the lid, and set to cook on high pressure for 15 minutes. After the timer goes off, allow 20 minutes of natural release before venting the remaining pressure. Blend the apple mixture, then use the sauté button to help simmer your sweet apple butter to achieve the right consistency. Note that you'll need to stir frequently so as not to scorch it on the bottom of the pot. Add the vanilla at the end.
- Reduced Sugar - Feel free to swap in your favorite cup-for-cup sweeteners for some or all of the added sugar. Note that you’ll need to double the time in the waterbath for canning, and

Expert Tips & Serving Suggestions
- Equipment Smarts. While not technically necessary, investing in a canning funnel, canning tongs, canning basket, and a lid rack, will make your life easier.
- Safety First. Sterilization is perhaps the most important thing for canning fruit preserves. Make sure the jars and lids are brought to a full boil and left for a minimum of 10 minutes to kill any bacteria.
- New Lids should be used each time you can for food safety, but feel free to use the same *sterilized* jar over and over!
- Waste not, want not. Instead of tossing the apple cores and spent orange halves, use them to:
- Make an infused simple syrup. Add equal parts sugar and water to a heavy-bottomed saucepan (or 2 parts sugar and 1 part water if you like a rich syrup, which will keep for up to 6 months in the fridge). Heat until the sugar is dissolved. Add the apple cores, spent orange halves, plus a stick or two of cinnamon and a few whole cloves if you like, and let steep for 40 minutes. Strain, pour into a squeeze bottle and store in the fridge for up to 2 weeks or more. Use as a syrup for waffles or pancakes, stir into oatmeal, or use as cocktail flavoring.
- Make a holiday simmer pot. Toss the spent orange rinds, apple cores, and 1-2 cinnamon sticks, 1-2 sprigs of rosemary, and/or a couple of whole cloves in a pot of water. Set it over medium-low heat to simmer gently. It’ll make your kitchen smell delightful!
- Get an apple corer/slicer. I'm not usually a proponent of what Alton Brown calls "uni-taskers," but if you like to eat a lot of apples in the fall, an apple corer is well worth the expense and space in your drawers.
Serving Suggestions
This delicious homemade apple butter walks the line between sweet and savory with a perfectly spreadable texture, making it ideal for a multitude of applications. Here are a few ideas to get you started:
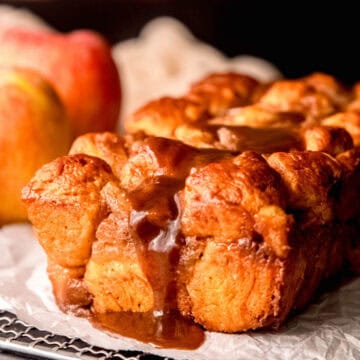
- On toast, english muffins, or warm biscuits—maybe with a little bit of peanut butter for a fun fall twist on PB&Js.
- On oatmeal banana protein pancakes or healthy pumpkin pecan waffles.
- Swirled into plain yogurt.
- As a topping on baked steel cut oatmeal.
- As a flavoring for cocktails.
- On a s’mores board, cheese plate or charcuterie platter.
- Served as a side or as a glaze on chicken, Dutch oven turkey breast or pork chops.
- Spread on sandwiches (especially turkey, chicken, or pork).
- As a filling for sandwich or thumbprint cookies.
- Swirled into salted caramel ice cream.
- As an inexpensive homemade gift.

Storage Instructions
- Since there is a decent amount of sugar (which acts as a preservative), this crockpot apple butter should be just fine in an airtight container in the fridge for up to 3 months, or in the freezer for up to a year!
- If canned properly, it should last for 12-18 months in the pantry—though the flavor and texture is always best within the first year. If you can it AND freeze it, it can last for several years. Once opened, use within a few weeks for the best flavor.
FAQs
The great thing about slow cooked apple butter is that texture doesn't matter; it's all gonna get blended into smooth, jammy goodness! As such, feel free to use apples that are a little on the mealy side (e.g. Red Delicious or Gala apples) that you wouldn't necessarily want to eat out of hand. That said, this recipe will work using any variety (or mixture) of apples that you like!
CANNING NOTE: If you plan on canning apple butter for pantry storage, I recommend throwing in a couple of Granny Smith Apples ~or~ adding 2 tablespoons of apple cider vinegar to the mix to increase the acidity.
You sure don't! Since we're blending it all up anyway (and since there's lots of good flavor and nutrients in the peels), keep it simple and leave the peels on.
Since apples (especially apple peels) are naturally high in pectin, there’s no need to add any extra thickeners to the mix. If you'd like your apple butter to get thicker, simply simmer it—in a slow cooker on high or on the medium sauté setting of the Instant Pot—with the lid off until enough liquid evaporates to reach a consistency that you like. (Don't forget to stir if using the sauté function so it doesn't burn!)
I personally think you'll get the best apple butter if you use the slow cooking function. Why? Slow cooking gives the mixture time to meld flavors and caramelize better than pressure cooking. That said, if you're in a rush, feel free to use the pressure cooking function—hop back up to the optional variations section for instructions.

More Apple-Centric Recipes

If you tried this recipe and loved it, be sure to rate and review it below! For more inexpensive and delicious recipe inspiration, be sure to follow me on Pinterest. You can also get all of my newest content delivered straight to your inbox by signing up for my email newsletter!

No-Peel Apple Butter for Canning (Instant Pot or Crockpot)
Equipment
- Instant Pot or Slow Cooker/Crockpot
- Sterilized Mason Jars or delitainers/airtight container if not canning
Ingredients
- 3 pounds Apples peel on, cored and diced
- ½ C brown sugar
- ½ C granulated sugar
- 1 Orange juiced
- 2 teaspoon Ground Cinnamon*
- 1 teaspoon Ground Ginger*
- ½ teaspoon Nutmeg*
- ¼ teaspoon Ground Cloves*
- ¼ teaspoon Allspice*
- 1 teaspoon Vanilla Extract
Instructions
- Prep Ingredients. Wash & chop apples. Add all ingredients (except for vanilla extract) to the Instant Pot or Crock Pot.3 pounds Apples, ½ C brown sugar, ½ C granulated sugar, 1 Orange, 2 teaspoon Ground Cinnamon*, 1 teaspoon Ground Ginger*, ½ teaspoon Nutmeg*, ¼ teaspoon Ground Cloves*, ¼ teaspoon Allspice*
- Cook, Covered. Cook for 10 hours on low heat.
- Blend the contents of the pot using an immersion blender.
- Thicken by continuing to cook another 2 hours on low, uncovered. Add vanilla extract and stir to combine. Spoon into clean jars and refrigerate or can for pantry storage.1 teaspoon Vanilla Extract
How to Can Apple Butter**
- Sterilize. While the apple butter is in the last 20 minutes of cooking, sterilize your mason jars and lids by boiling in a large water bath (large pot filled with water) for 10 minutes over medium-high heat. Carefully remove the sterilized hot jars and lids to a clean kitchen towel to dry.
- Fill. Spoon the hot apple butter into your sterilized jars, leaving ½ inch headspace at the top of the jar. Place the lids on and tighten.
- Process. Lower the cans into the water bath, bring to a full rolling boil, and process for 15-25 minutes. (Shorter times are appropriate for locations closer to sea level. Longer times are appropriate for larger jars or at altitude. You'll know if they processed long enough if the jar snaps shut during cooling.) Remove the water bath from heat and allow the cans to rest in the water for 5 more minutes.
- Cool & Label. Remove the jars from the water to a clean kitchen towel, lid sides up. Using another clean kitchen towel, test to make sure the lids are fully tightened. Allow to rest undisturbed at room temperature for 8-12 hours. When the jars are dry and cool, label with the date and contents before storing.
- Important Canning Safety Note: The mason jar lids should suck in and create a vacuum seal during the cooling process—you’ll start hearing loud snaps in the kitchen after about an hour or two. (It’s alarming if you’re not expecting it!) If any don't pop in, unscrew the ring top and lightly press the lid to see if it will stick. If not, you can either process in the water bath again (this time increase how long you leave them in), or keep them in the fridge or freezer.
Notes
- Equipment Smarts. While not technically necessary, investing in a canning funnel, canning tongs, canning basket, and a lid rack, will make your life easier.
- Safety First. Sterilization is perhaps the most important thing for canning fruit preserves. Make sure the jars and lids are brought to a full boil and left for a minimum of 10 minutes to kill any bacteria.
- New Lids should be used each time you can for food safety, but feel free to use the same *sterilized* jar over and over!
- Waste not, want not. Instead of tossing the apple cores and spent orange halves, use them to:
- Make an infused simple syrup. Add equal parts sugar and water to a heavy-bottomed saucepan (or 2 parts sugar and 1 part water if you like a rich syrup, which will keep for up to 6 months in the fridge). Heat until the sugar is dissolved. Add the apple cores, spent orange halves, plus a stick or two of cinnamon and a few whole cloves if you like, and let steep for 40 minutes. Strain, pour into a squeeze bottle and store in the fridge for up to 2 weeks or more. Use as a syrup for waffles or pancakes, stir into oatmeal, or use as cocktail flavoring.
- Make a holiday simmer pot. Toss the spent orange rinds, apple cores, and 1-2 cinnamon sticks, 1-2 sprigs of rosemary, and/or a couple of whole cloves in a pot of water. Set it over medium-low heat to simmer gently. It’ll make your kitchen smell delightful!
- Get an apple corer/slicer. I'm not usually a proponent of what Alton Brown calls "uni-taskers," but if you like to eat a lot of apples in the fall, an apple corer is well worth the expense and space in your drawers.
- Since there is a decent amount of sugar (which acts as a preservative), this crockpot apple butter should be just fine in an airtight container in the fridge for up to 3 months, or in the freezer for up to a year!
- If canned properly, it should last for 12-18 months in the pantry—though the flavor and texture is always best within the first year. If you can it AND freeze it, it can last for several years. Once opened, use within a few weeks for the best flavor.

Comments
No Comments