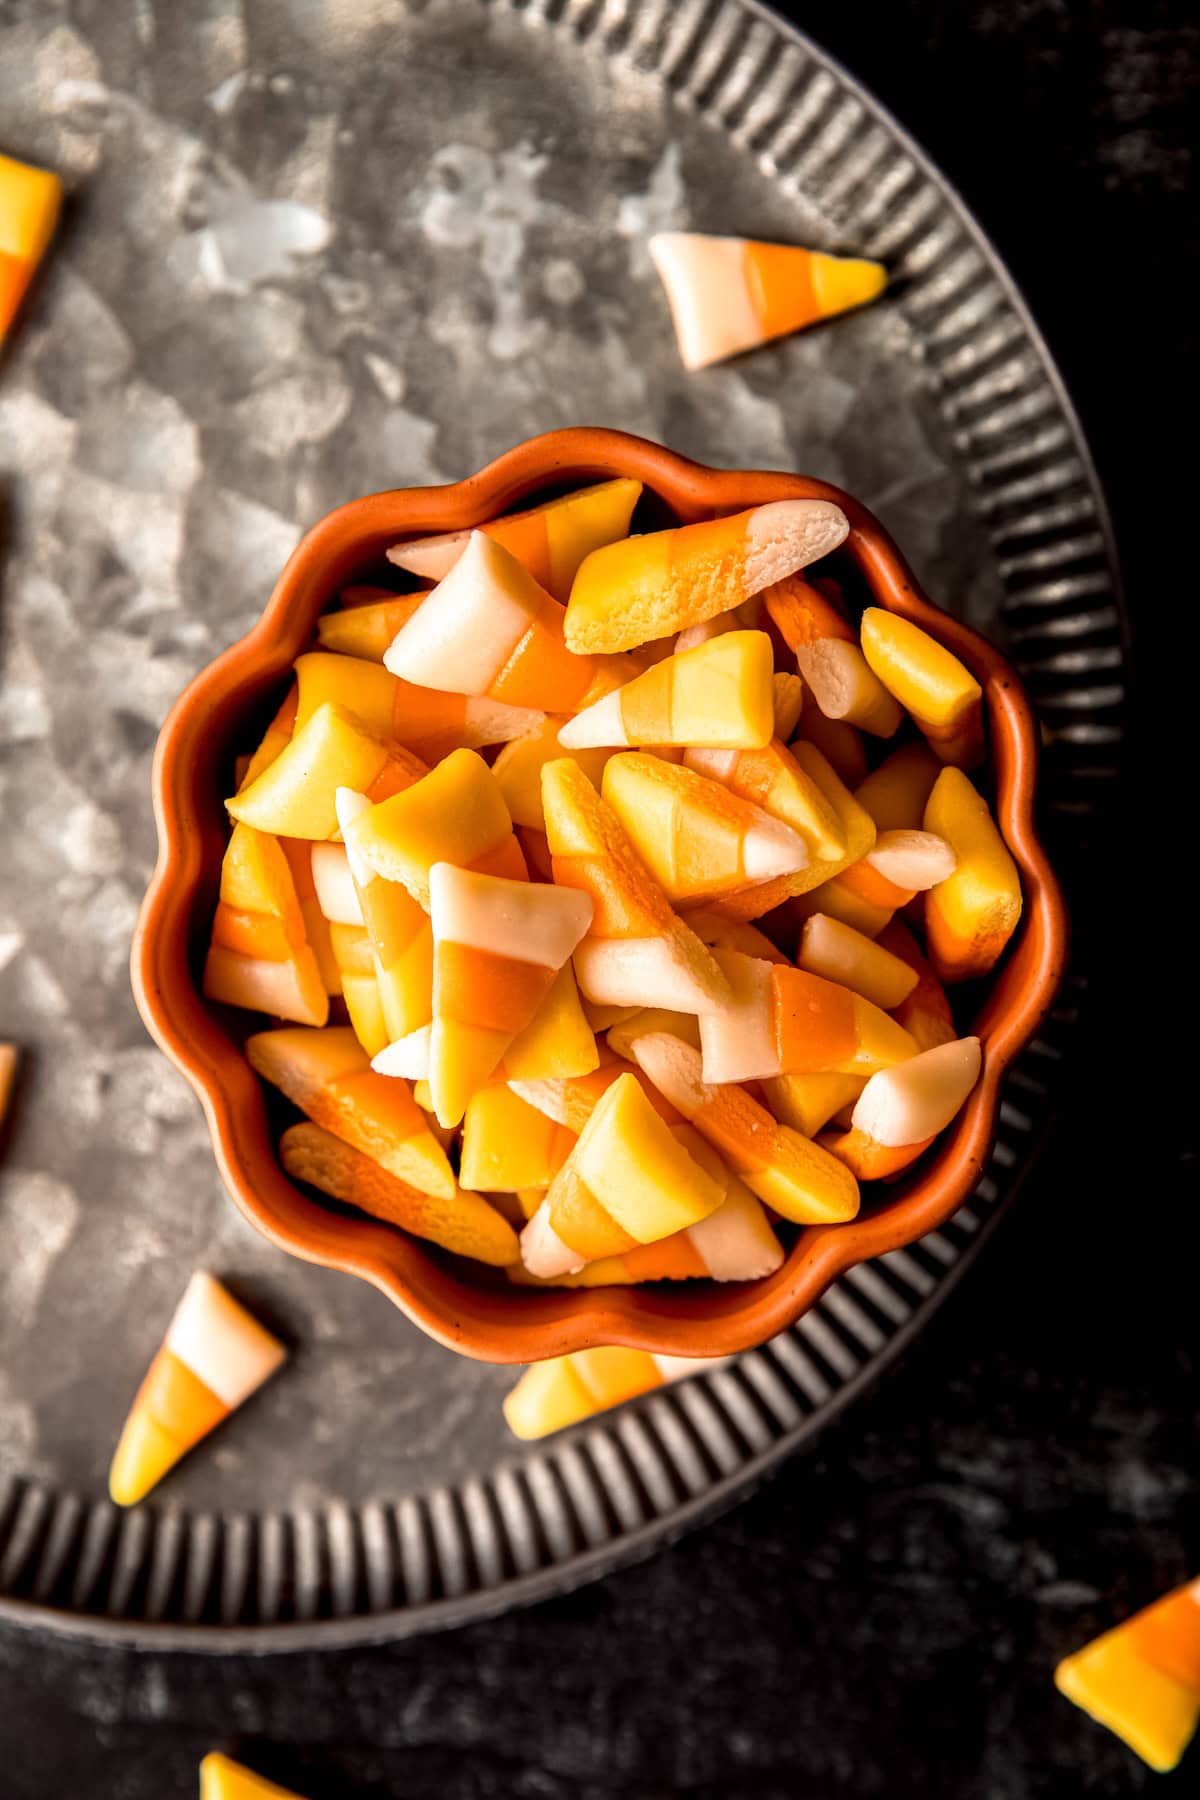
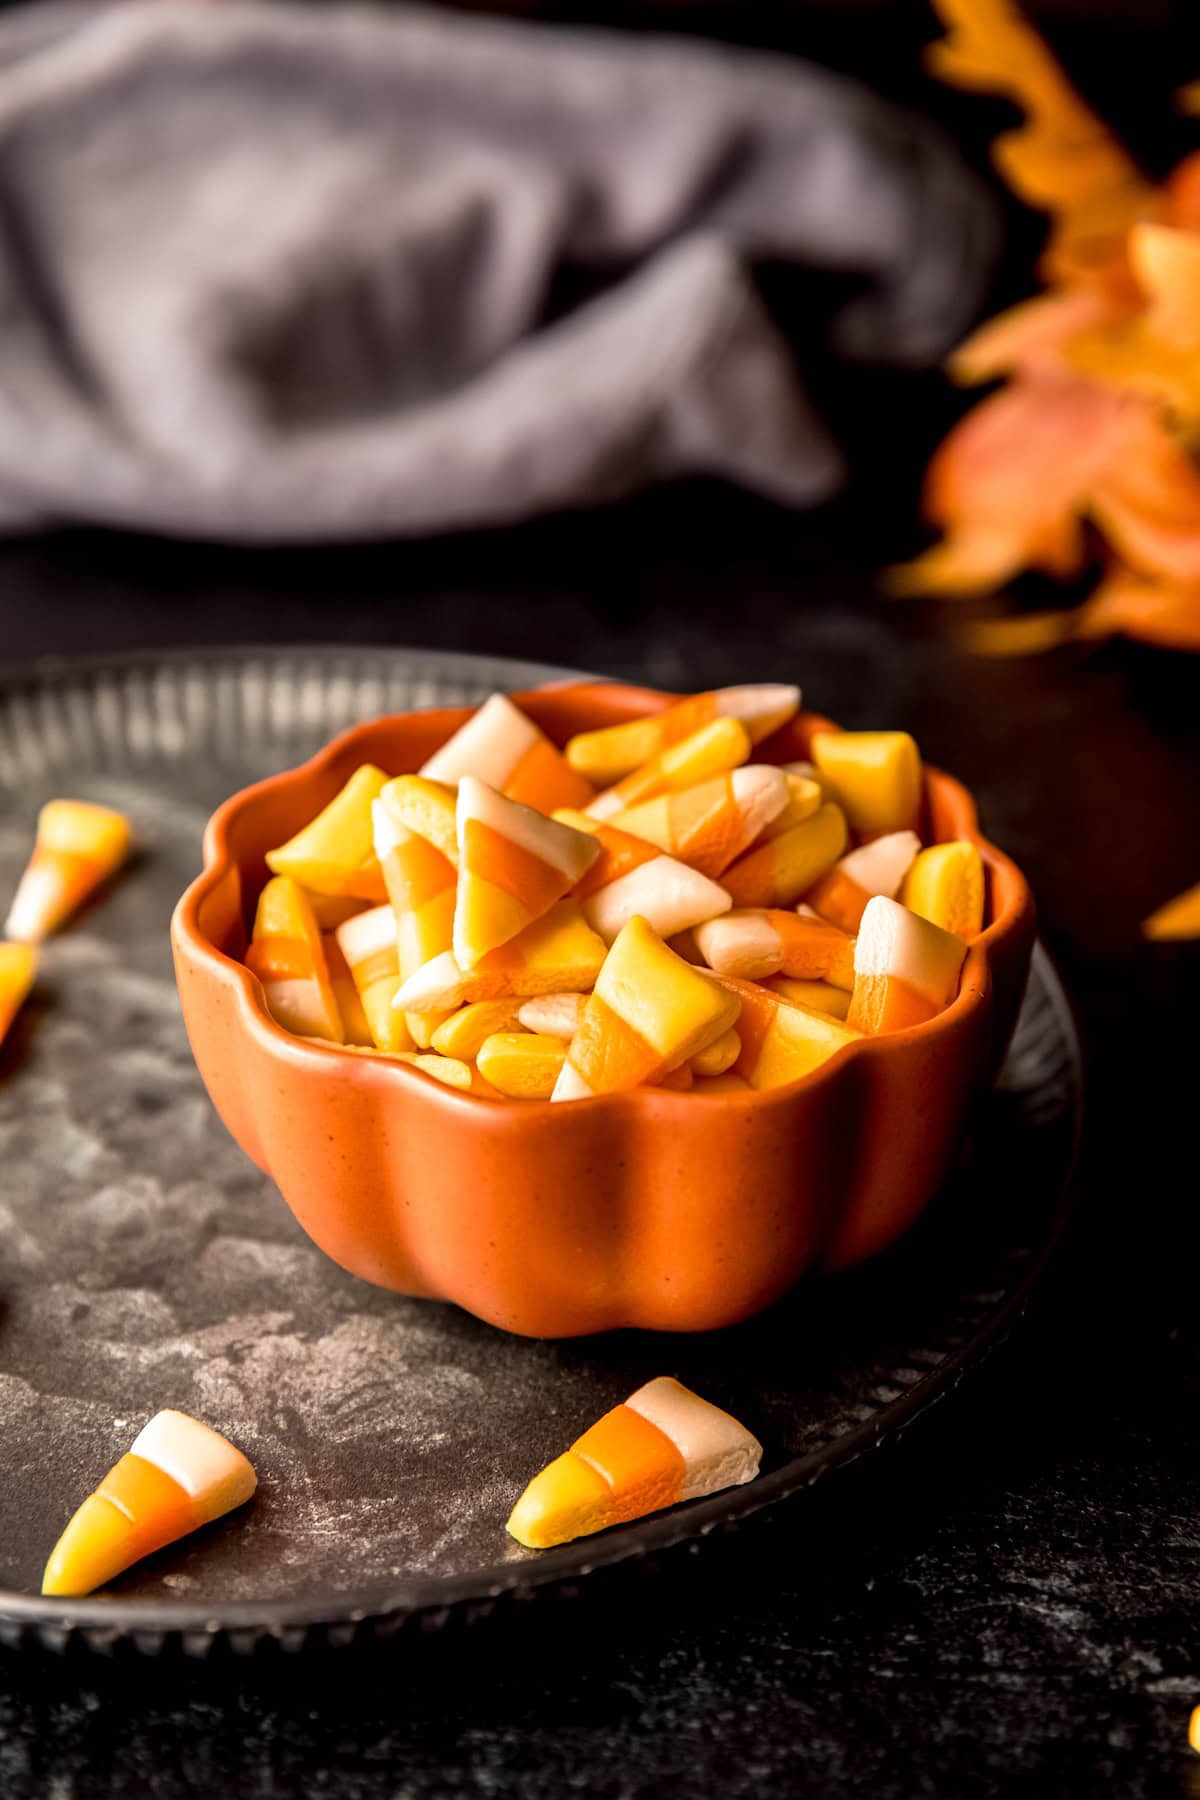
Some people love it, some people hate it, but if you're even a moderate fan of this seasonal treat, just wait until you try this glorious Homemade Candy Corn recipe. My better-than-Brach’s recipe uses real honey, yielding a delicious treat that tastes like childhood. Pair it with some salted peanuts or pretzels and you have a salty-sweet, chewy-crunchy fall delight!
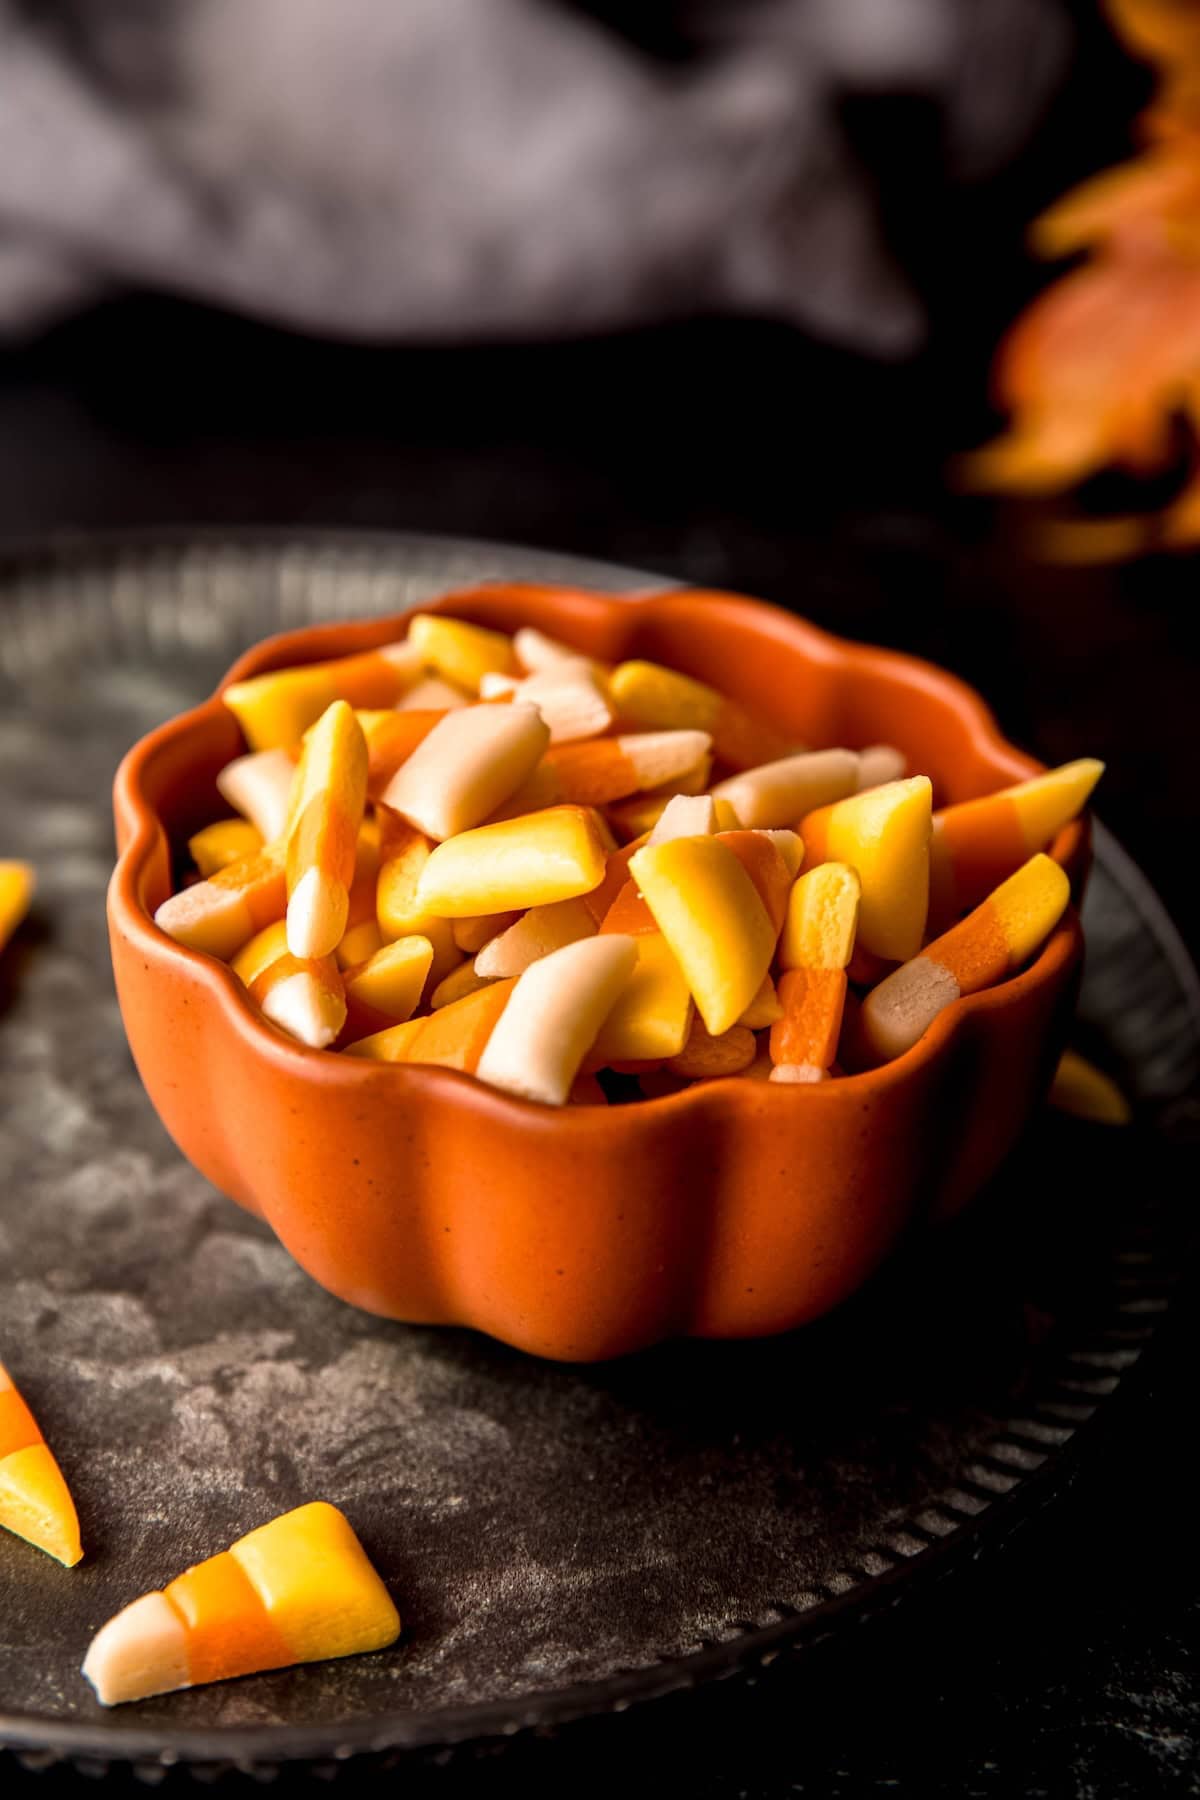
I assume if you're reading this, you hold the same opinion of traditional candy corn as I do: it's awesome. (If you don’t think that, prepare to have your mind changed.) As with most foods, the DIY version is even better—the buttery honey-vanilla flavor and the delectable chew of homemade can’t be beat. But, how is candy corn made? The answer is: simply!
Despite what you might think, candy corn ingredients are actually easy to come by. Chances are you already have most (if not all) of what you need in the pantry already. And the method for making it is super straightforward—like a fun after-school science-meets-crafting project. If you’ve got kiddos at home, I have a feeling they’ll be excited to help.
Jump to:
Why You’ll Love This Copycat Brach’s Candy Corn
- Edible & Educational - Making your own candy corn is a great science experiment (sugar crystals change their form to become stretchy!) that can also be used to teach math (what's an easier way to grasp fractions than measuring cups??). Plus, the dough is almost like PlayDough, so the kids can get a little crafty, too. Hello, STEAM learning!
- Better Than Store-Bought - This homemade candy corn with honey has the flavor profile of regular candy corn mixed with the honeyed sweetness and extra chewiness of Bit O' Honey candy. If you even remotely like candy corn, you're gonna lose your mind when you try some of the homemade stuff—it’s absolutely bonkers.
- All-Natural - Unlike their store-bought counterparts, homemade candy corn is made with only real, easily accessible ingredients. Forget artificial flavors, waxy coatings, and a bunch of preservatives. Heck, you can even make dye-free candy corn by swapping in natural colorings like turmeric and beet powder!
Ingredients & Substitutions
As promised, you only need basic ingredients to make this recipe. I'd bet you already have most of what you need on hand. (You're also going to need a heavy bottomed medium saucepan and a candy thermometer.) Here’s what to grab:
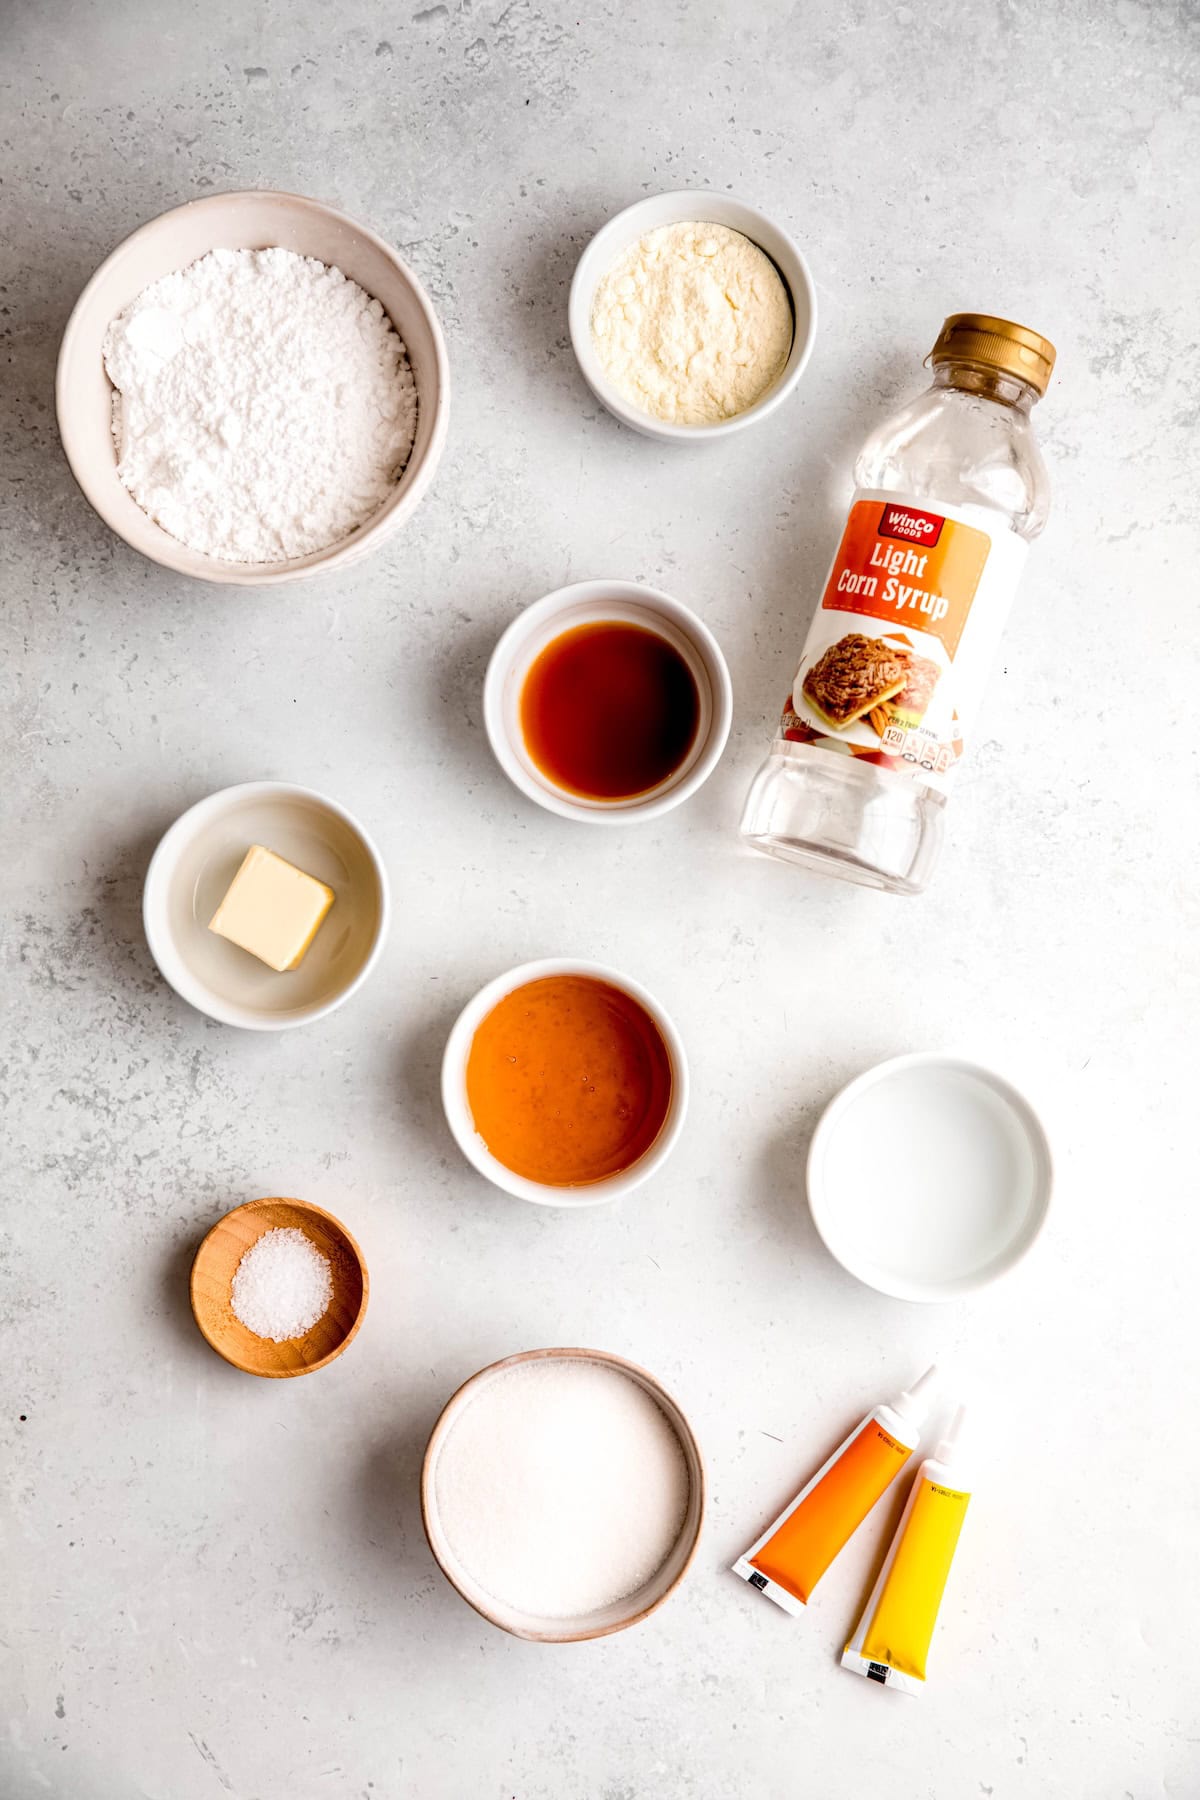
- Powdered Sugar - For sweetness and stability. If you don’t have any on hand, make your own confectioners' sugar by blitzing granulated sugar with cornstarch or potato starch in a food processor or blender, using a 1 cup to 1 tablespoon ratio.
- Dry Milk Powder - This adds a creamy richness and a bit of protein. Feel free to use any percentage of dry dairy milk or any variety of dried plant-based milk. For an extra layer of yummy, swap in malted milk powder.
- Butter & Kosher Salt - I find that adding a bit of extra salt helps make the candy corn taste extra buttery. Feel free to cut by half if you like a more classic taste.
- Granulated Sugar, Light Corn Syrup & Honey - This trio of sweeteners is what creates our soft ball candy base. You’re welcome to use superfine/caster sugar or cane sugar for granulated, invert sugar or golden syrup for corn syrup, and light/dark corn syrup or maple syrup for the honey.
- Water - Start with filtered water for the cleanest taste. You can also experiment with fruit juices if you’d like to change the flavor.
- Vanilla Extract - For added depth and aromatic warmth. You’re welcome to use an equal amount of vanilla paste (though it’ll leave little black flecks in the dough) or vanilla powder.
- Gel Food Color - Gel food coloring has more intense pigment than liquid food coloring, but either will work. Alternatively, use coloring powders like luster dust or natural coloring agents like turmeric, beet powder, or matcha. You’re welcome to use the color combination of your choosing (e.g. yellow and orange for classic, or red, white and green candy corn for "reindeer corn" at Christmas time!)
How to Make Candy Corn with Honey
These yummy treats were adapted from Alton Brown’s original recipe, but I wanted to make my candy corn with honey (like my favorite store-bought brand) and also prefer my sweets a little on the saltier side. Aside from that, the method is the same! Here’s how to make it:
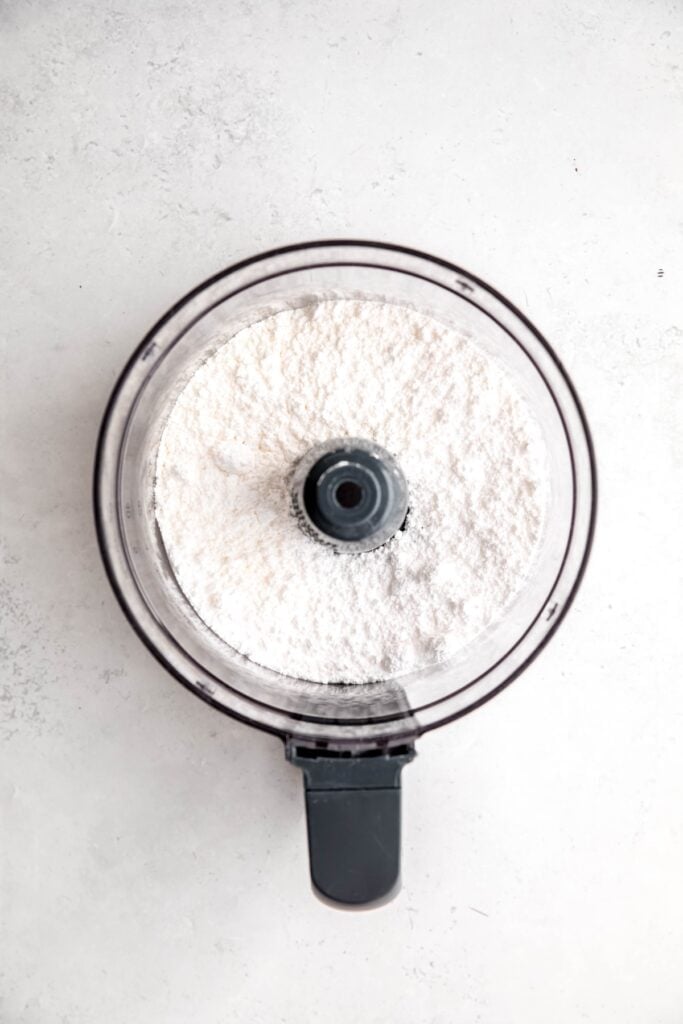
Step 1: Blitz Dry Ingredients. Pull out your food processor fitted with the blade attachment. Alternately, you can use a blender. Tip in the powdered sugar, dry milk powder and salt, then whiz it until the powdered milk is nice and fine. This took me about 30 seconds. Set the dry mix aside.
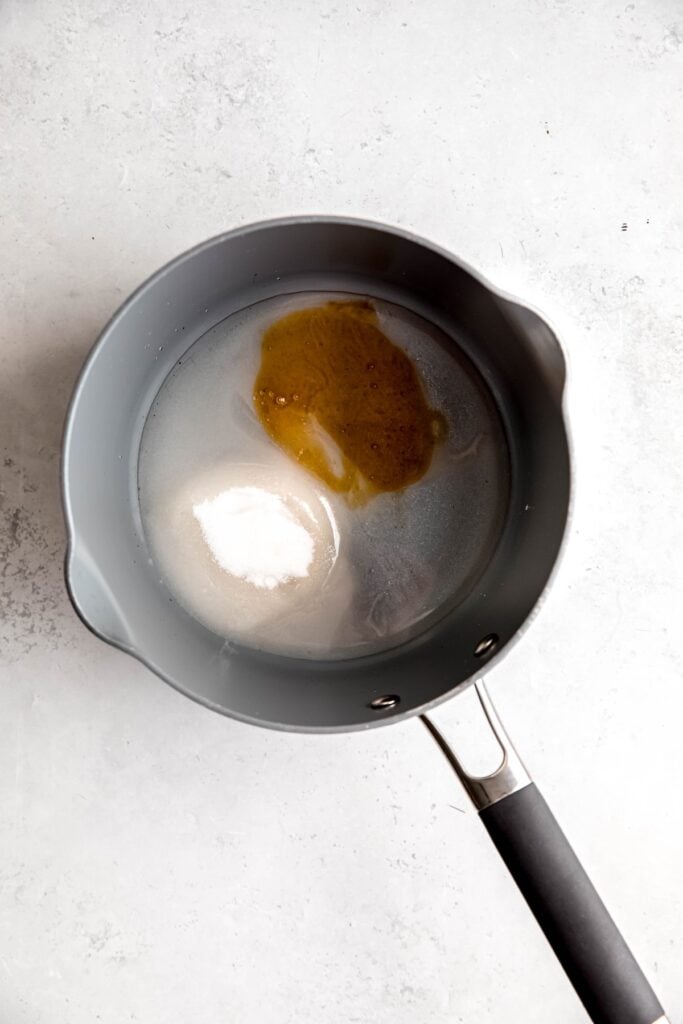
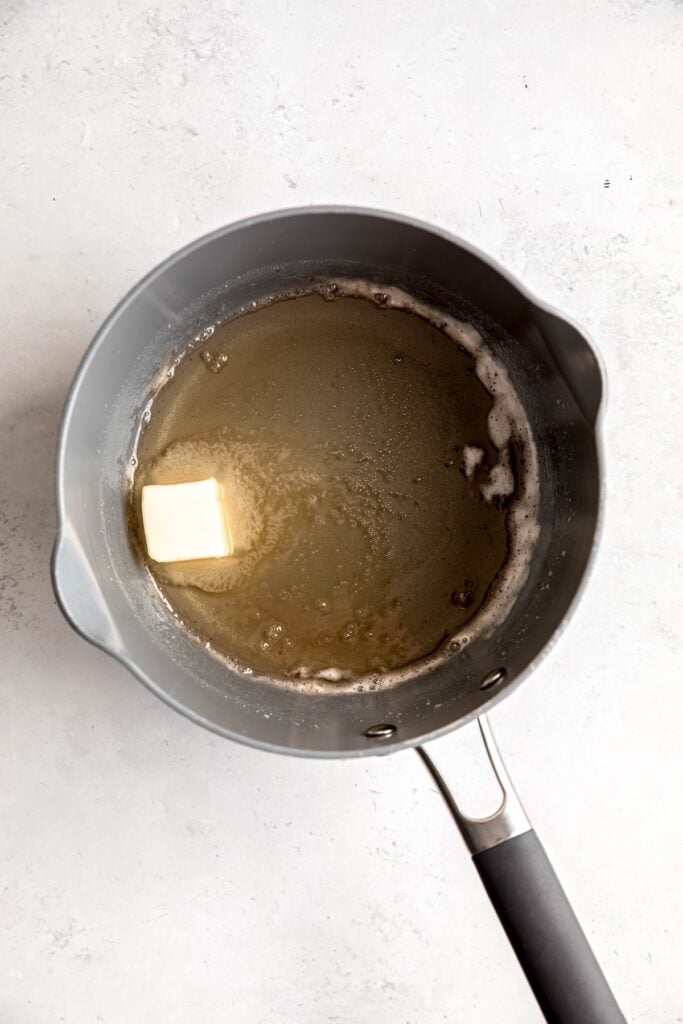
Step 2: Simmer. In the saucepan, combine the sugar, corn syrup, honey and water. Stir to combine and bring to a simmer over medium heat. Let simmer for four minutes undisturbed, then add butter. Clip the candy thermometer to your pan and make sure the tip is not touching the bottom, which can give you a falsely high reading. If you're using a glass thermometer, brush up how to read it properly with this kid-friendly video. Once the temperature hits 135F, you can turn off the heat and add the butter. The temperature should continue to rise from carry-over cooking—our target for soft ball stage is between 135-140F.
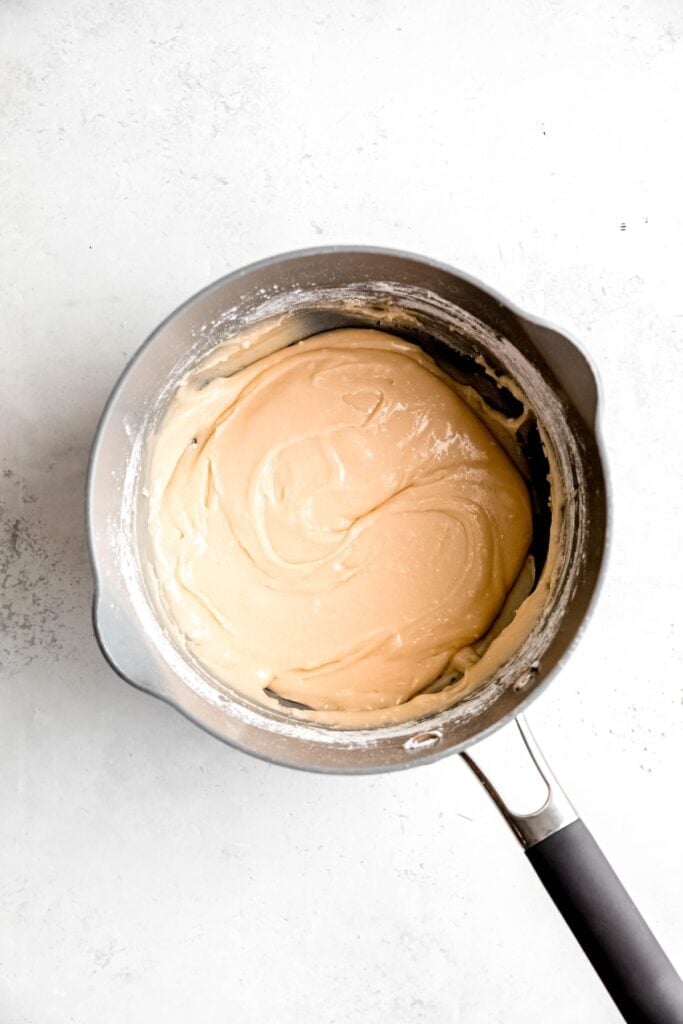
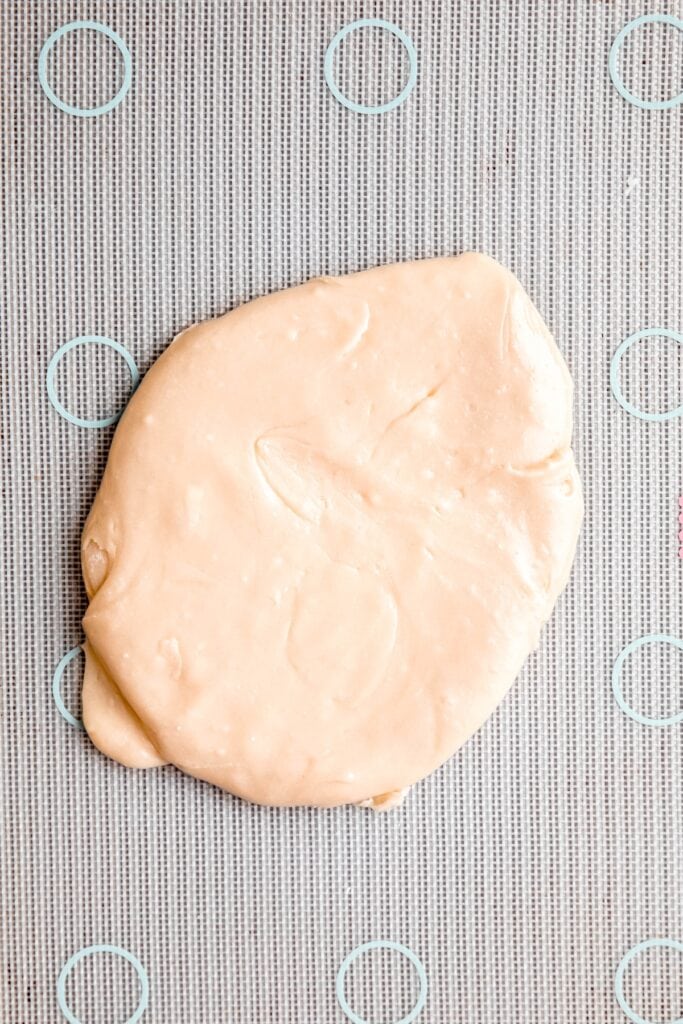
Step 3: Combine Wet & Dry Mixture. Add the powdered sugar mixture and the vanilla to the corn syrup mixture, and stir vigorously with a silicone spatula to combine until it creates a thick dough. You'll need to let the mixture cool down quite a bit before it can be handled by tiny humans. To speed up the process, pour the mix out onto a parchment, wax paper or Silpat lined baking sheet. It should only take about 10-15 minutes to cool this way, versus 30-40 minutes if you leave it in the pan.

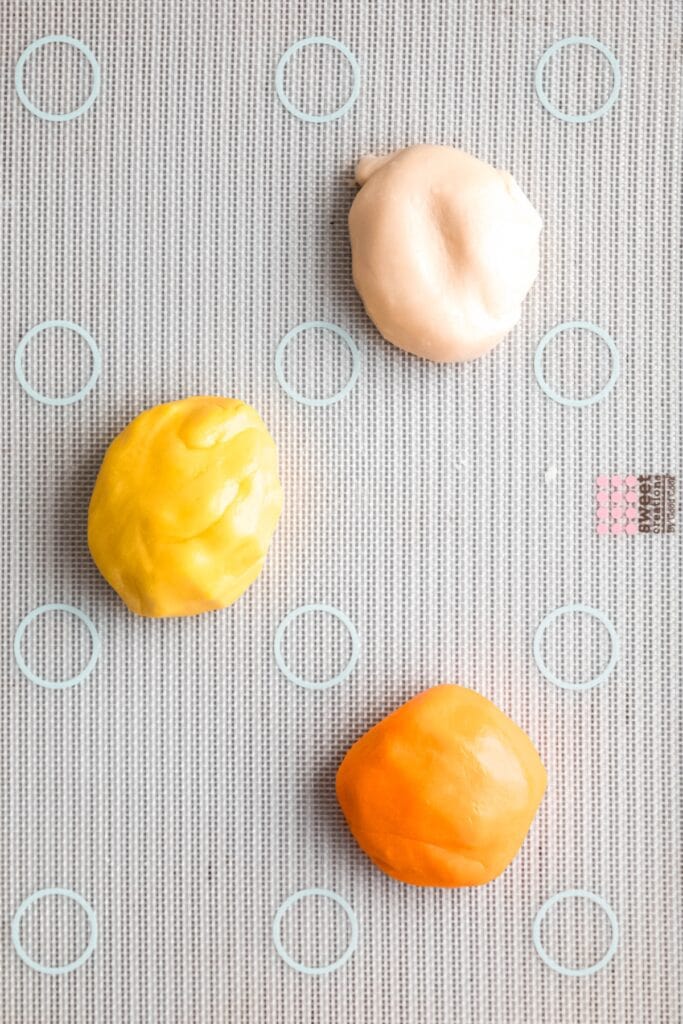
Step 4: Dye. Once the dough is cool enough to handle, but still warm enough to be pliable, separate it into three roughly even pieces. I shaped mine into quasi-donut shapes with a small indentation in the center to drip your food coloring. Once you have your dough portioned out, start with 2-3 drops of gel food coloring per piece. Knead the dough until the color is uniform throughout.
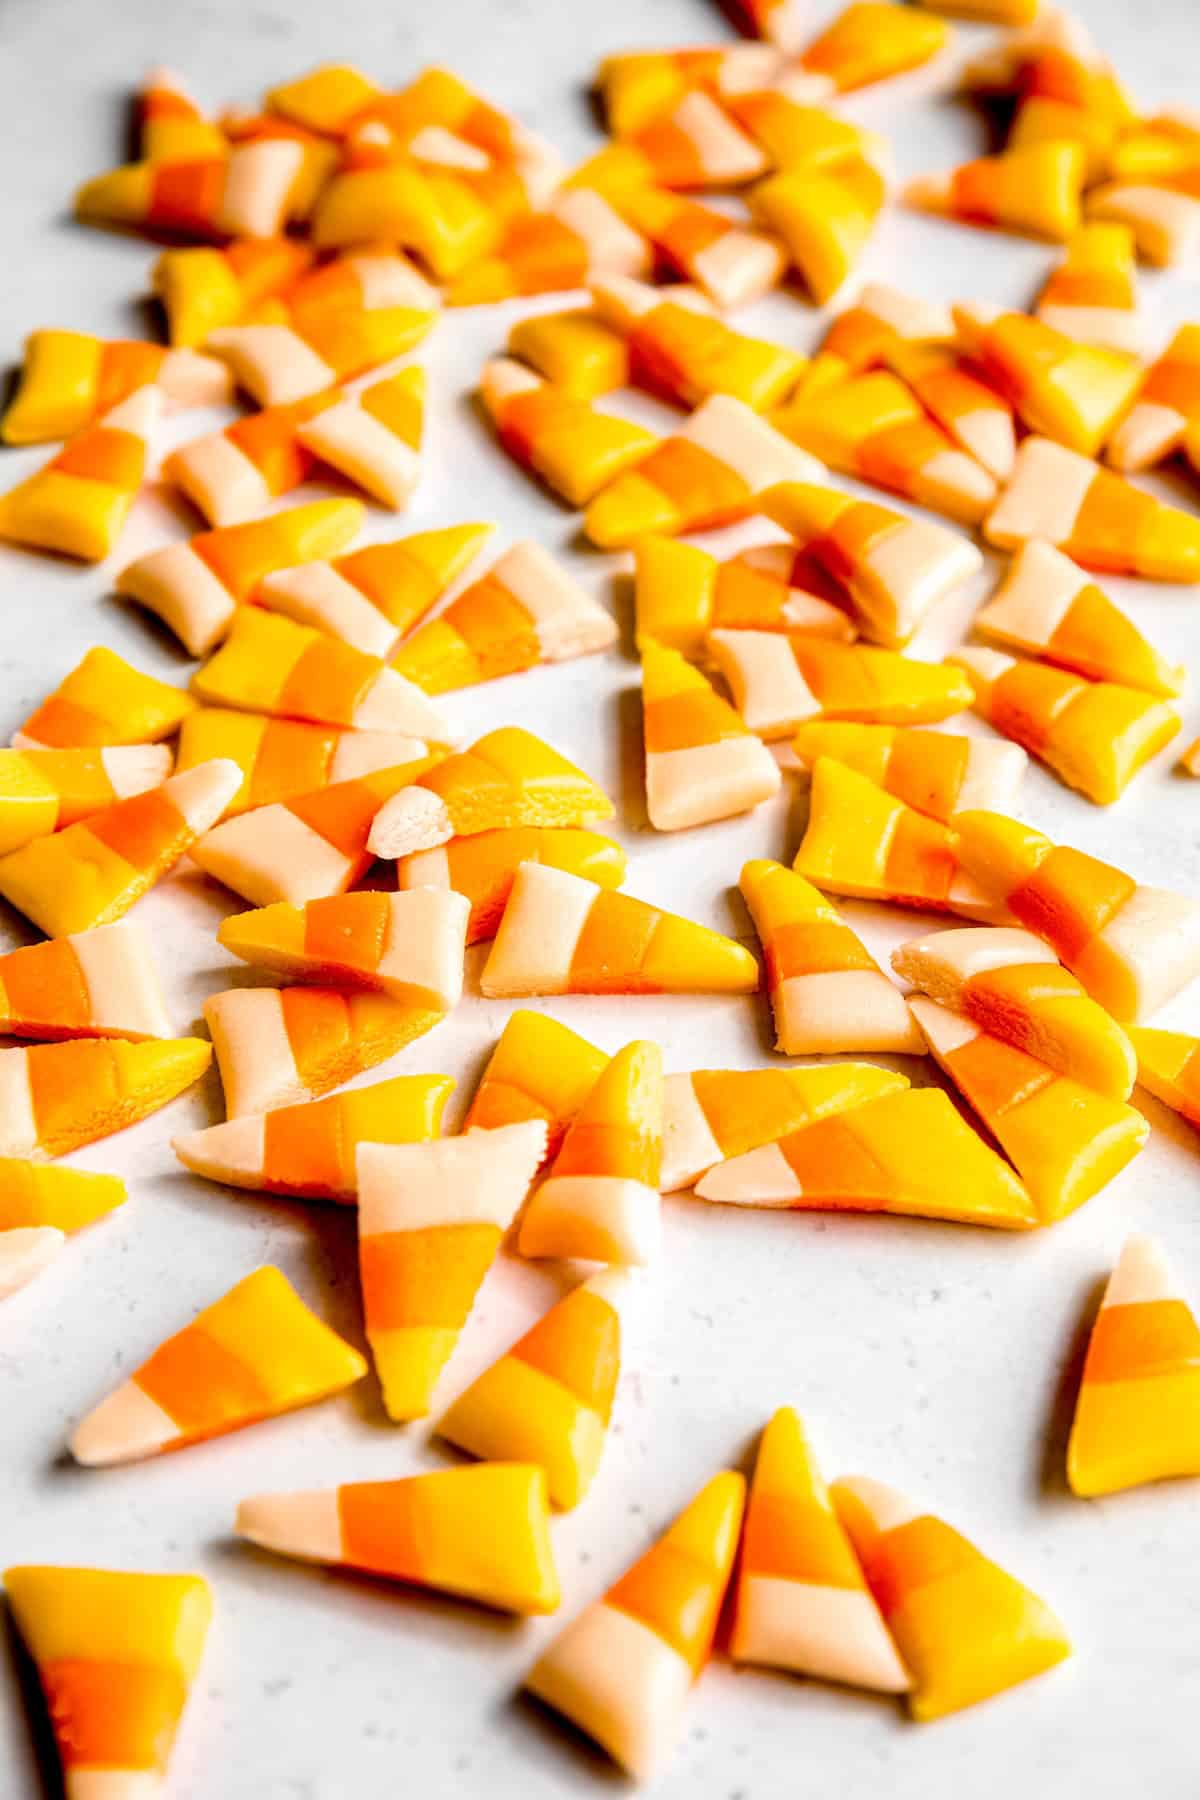
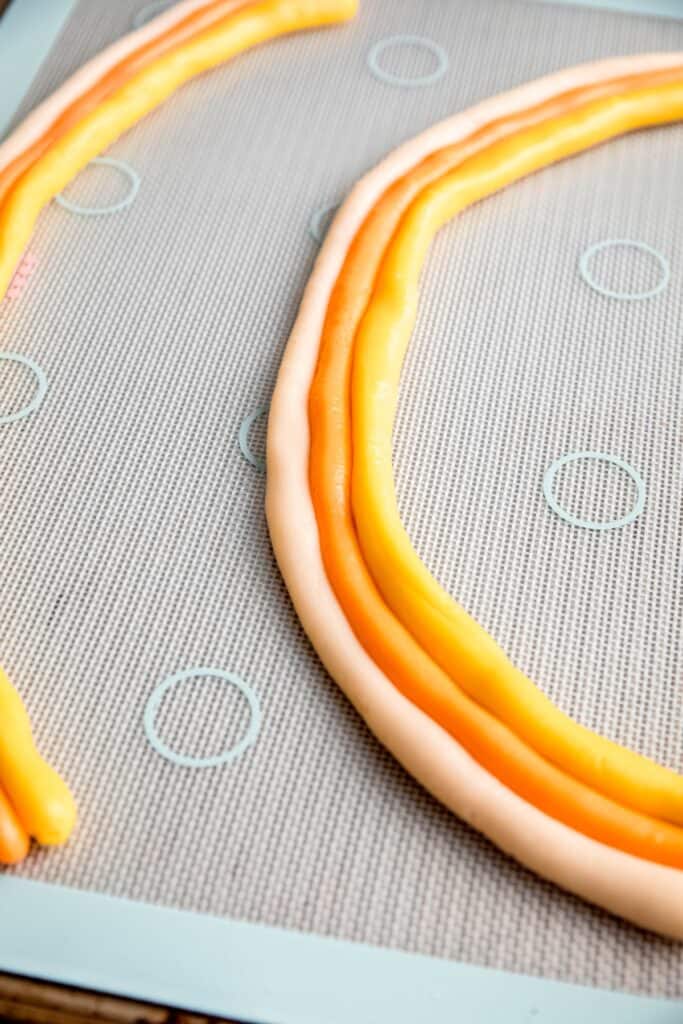
Step 5: Shape. Cut each of your colored dough pieces in half. Roll each one out into a long, thin rope, about ½" thick and about 2' long. Stack one of each color in the desired order, then use your fingers to smoosh the strands together vertically, being careful not to obscure the middle color. Using the palm of your hand, vigorously rub the top of the three strands to help flatten them together, as well as to increase the shine. Flip the triad over, then repeat with your palm on this side until shiny and relatively flat. (You can also use a rolling pin, but I find it doesn't get as shiny if you do.)
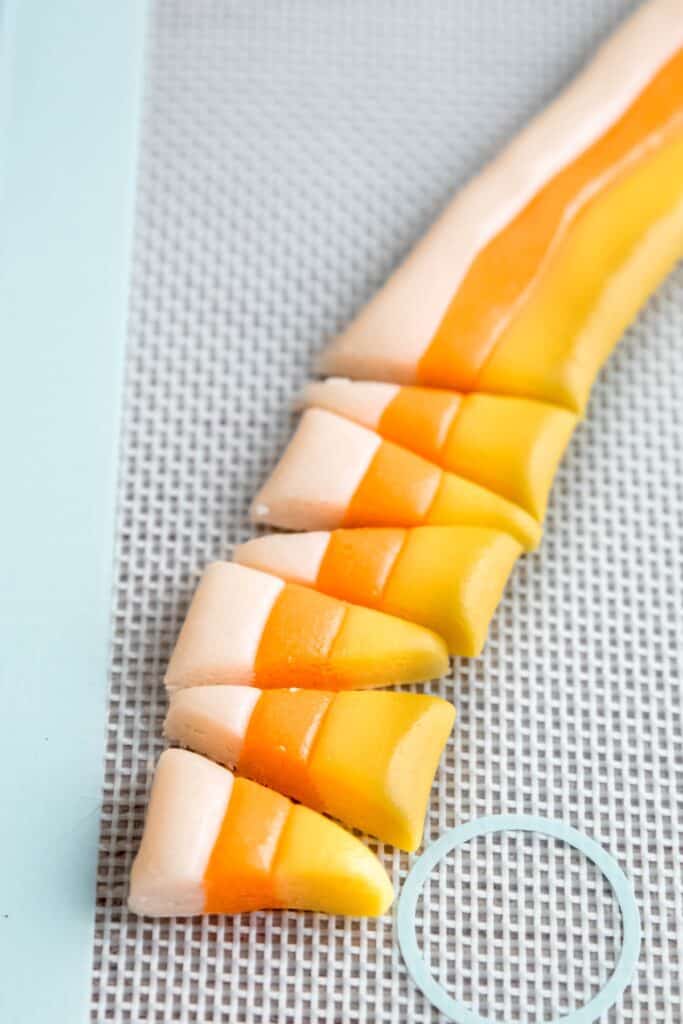
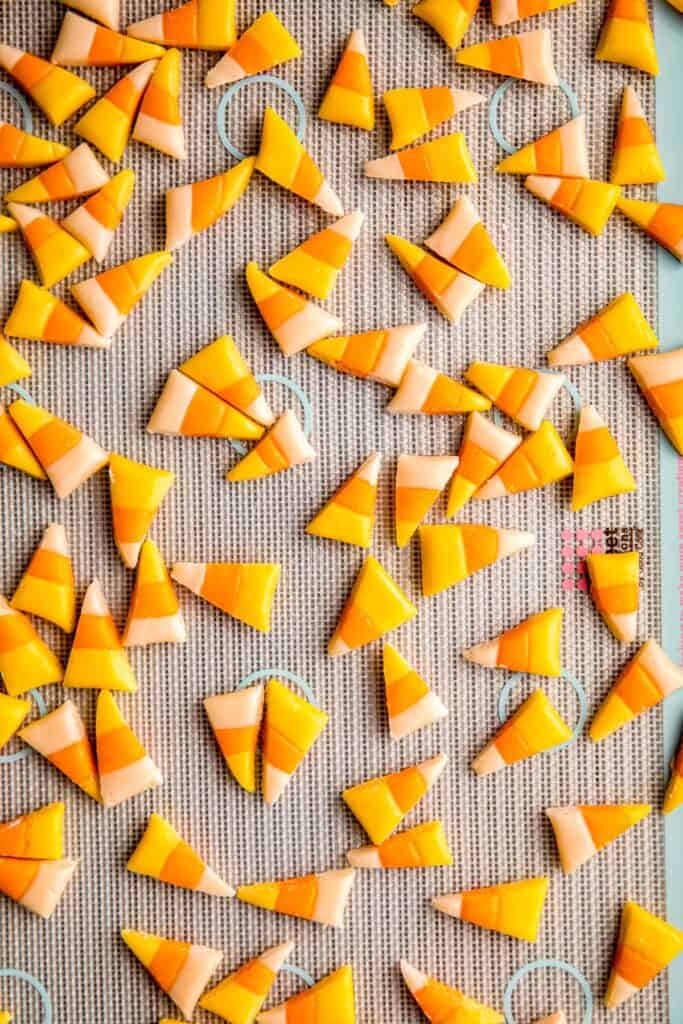
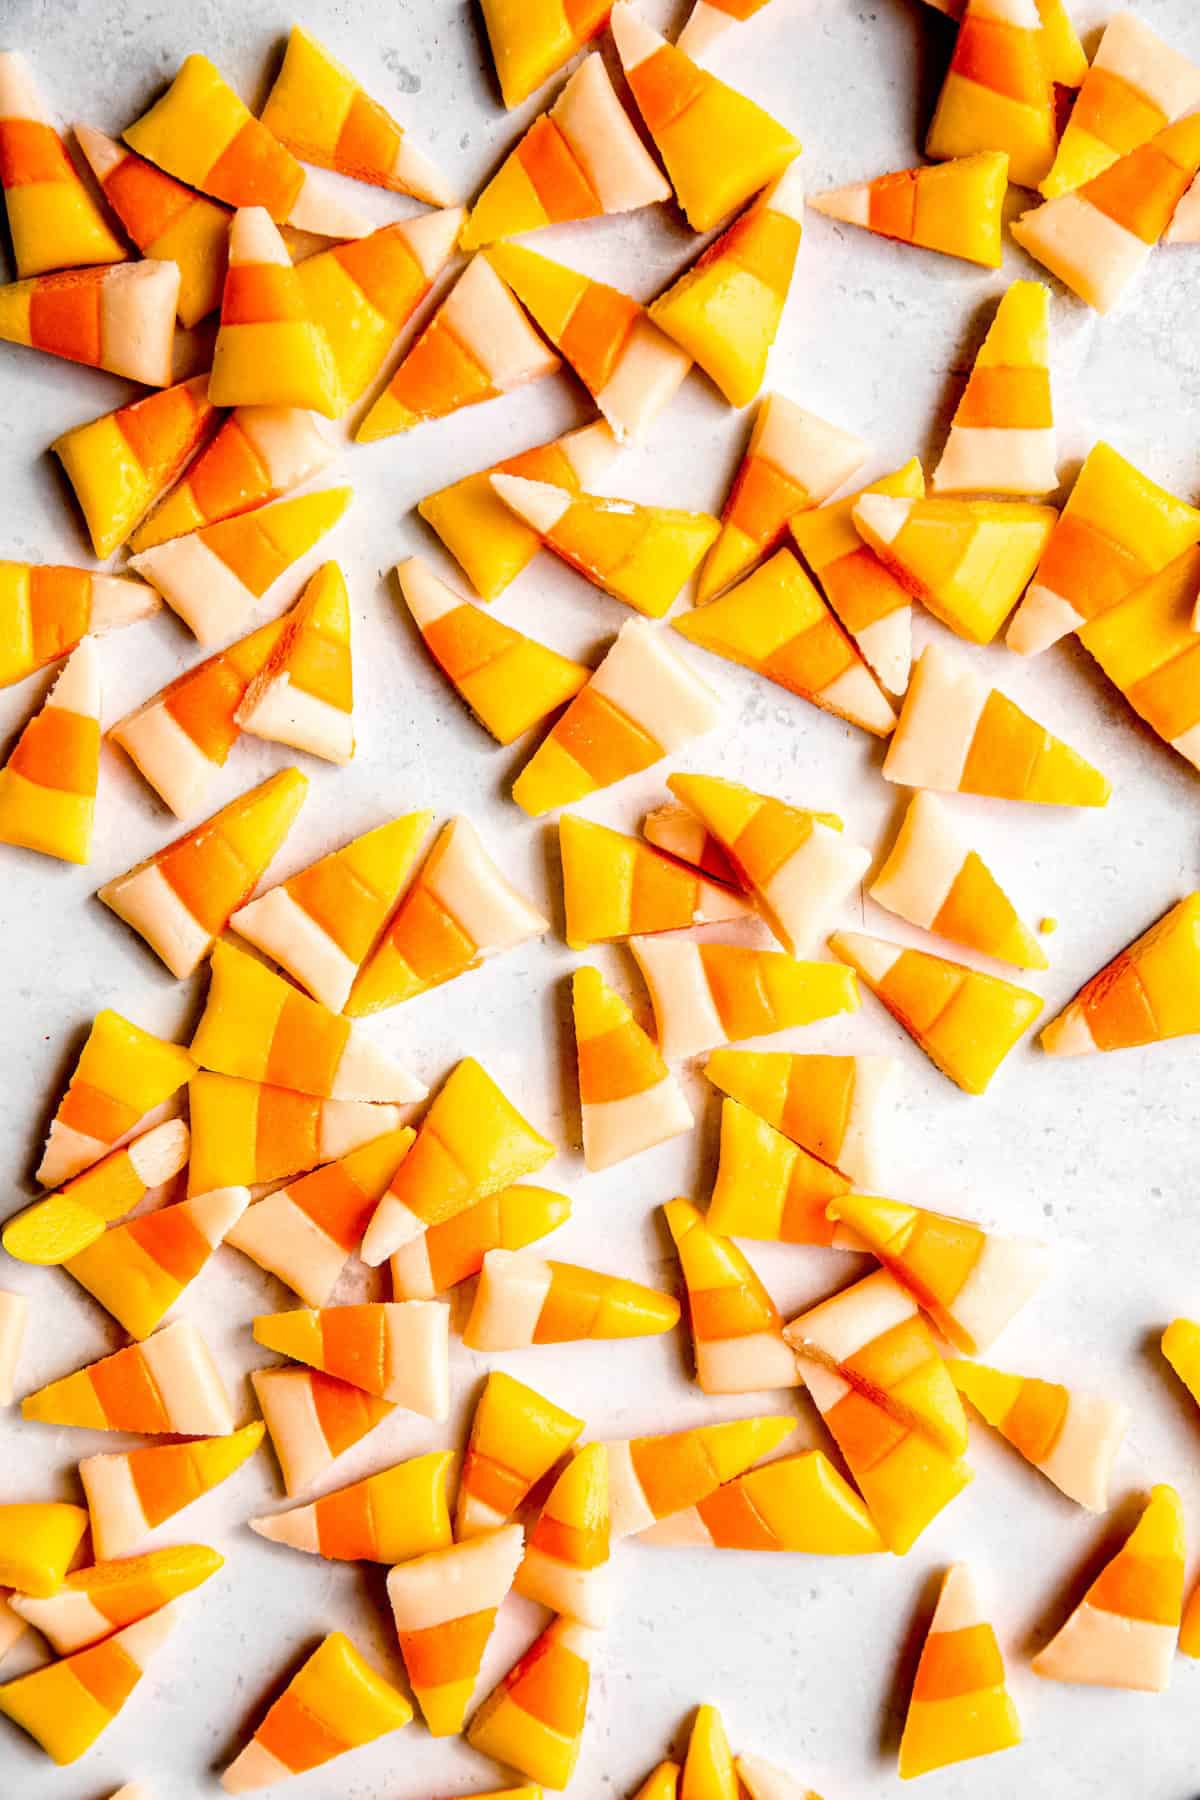
Step 6: Cut. Using a bench scraper (or a sharp knife, if you're an adult), cut small triangular pieces by alternating your tip left \ and right /. Keep going until all the pieces are cut. Allow to cool completely, then store in single layers between pieces of parchment. Enjoy!
Optional Variations & Dietary Adaptations
- Vegan Candy Corn - Simply sub in powdered coconut milk, vegan butter and extra corn syrup for the honey. If you go this route, try using dark corn syrup in addition to the light corn syrup for greater depth of flavor.
- Candy Corn Colors - By swapping the dye, you can easily make this a year-round treat. For Halloween candy corn that’s a little spookier, try black, green and orange instead of the traditional orange, yellow and white. Want to make some Christmas candy corn? Make it red, green and white. Easter candy corn? Pastel pink, blue and yellow would be cute. Valentine candy corn? Red and pink ought to do the trick. You’re also welcome to use all-natural dyes if you don’t want to use artificial food coloring.
- Customize Shapes - The candy dough can easily be molded however you like. If you prefer pumpkin candy corn, for example, you can either shape them by hand (great if you have a lot of kids to entertain 😅) or use a silicone pumpkin mold to knock out a bunch at once. Just roll the pieces into small balls, then press them with your thumb to fill the molds.
- Candy Corn Flavors - While the honey-vanilla combo is classic, you have plenty of options. Try replacing a few tablespoons of the powdered sugar with unsweetened cocoa powder for chocolate candy corn. Or, substitute the vanilla extract for other flavors like maple (great for Thanksgiving candy corn), lemon or strawberry (for spring), or mint (for Christmas). Note that other flavoring extracts are more potent than vanilla, so start with half as much, then adjust to taste.
Expert Tips
- Make it work, regardless of your equipment. If you don't have a candy thermometer, you can still make candy corn, but you'll need a glass of water nearby to know when the mixture gets to soft ball stage.
- Keep kids safe. If you're making this with little ones, be sure to have them only observe and not touch during the simmering step. The caramelization of sugar creates something that I imagine is akin to napalm. If it gets on your skin, it will burn and slough off when you try to remove it. Trust me, I've done it.
- Soften the dough. Allowed the dough to cool too much before kneading and shaping? Not to worry! Simply microwave the candy corn dough in 10 second bursts until it is soft enough to work with.
- Clean hands. If you're worried about your hands getting stained, you can wear gloves. I found that the longer I worked the dough, the color got pulled from my skin and back to the dough.
- A note on colors. Homemade candy corn with honey doesn't quite come out stark white. Depending on how dark your honey is, the dough may even be a little tan colored. If you want a straight white candy base, omit the honey and sub more light corn syrup instead. Otherwise, color all three pieces of dough.

Storage Instructions
- Room Temperature: Place the pieces in an airtight container and keep them at room temperature for 7–10 days. To prevent the candies from sticking together, line the container with parchment paper and store them in a single layer, adding additional sheets of parchment between each layer. Avoid refrigeration, as the extra moisture can affect the texture.
- Refrigeration & Freezing are not recommended, as the humidity can negatively impact the consistency.
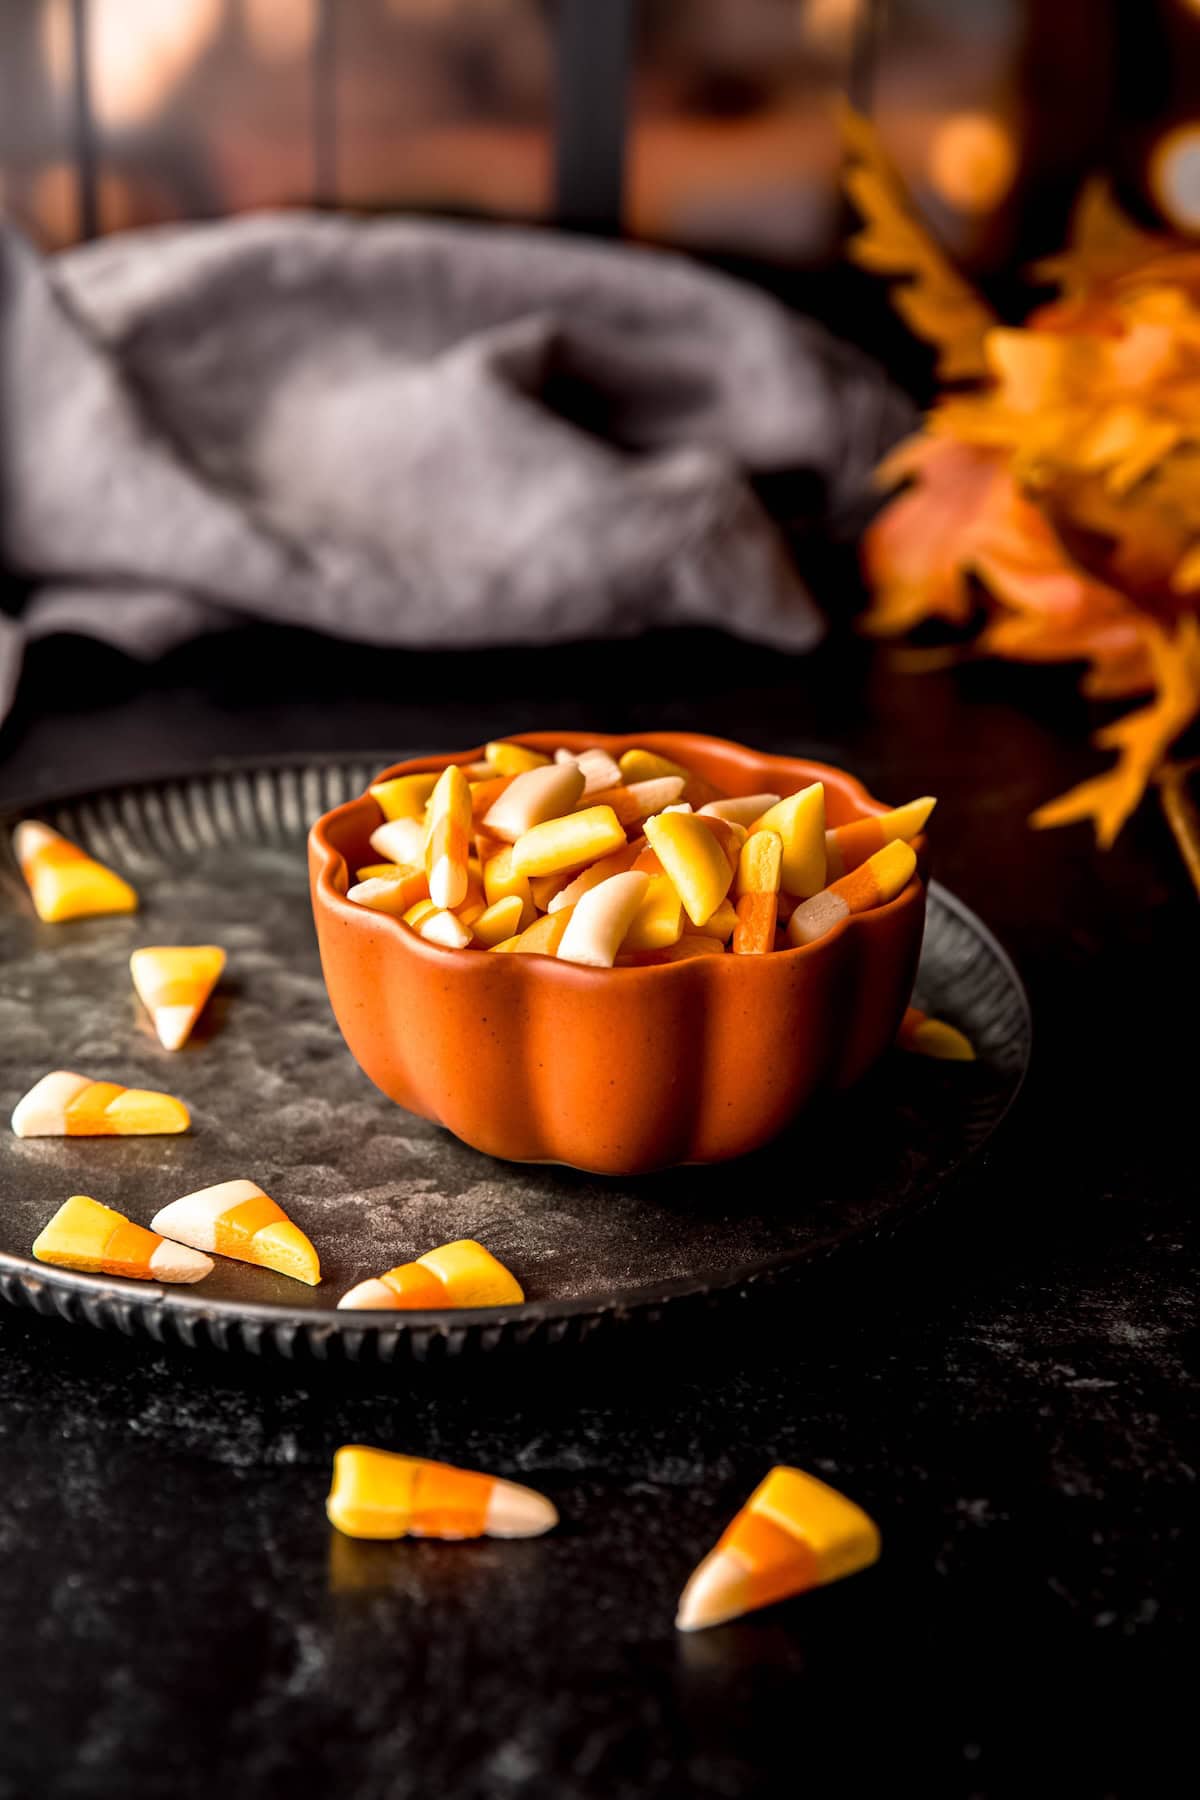
Serving Suggestions
Homemade candy corn is nostalgic on its own, but there are so many creative ways to enjoy it beyond snacking straight from the jar:
- Candy Corn & Peanuts - A classic salty-sweet combo that never goes out of style—it tastes like a chewy butterfinger! Mix equal parts roasted, salted peanuts with your homemade candy corn for the perfect Halloween party treat.
- Candy Corn Trail Mix - Add candy corn to a mix of pretzels, almonds, cashews, dried cranberries or raisins, and M&Ms. It’s colorful, festive, cheaper than store-bought, and perfect for tucking into lunchboxes.
- Candy Corn Chex Mix - Stir candy corn into your favorite fall Chex mix recipe for a pop of sweetness. It’s especially tasty when paired with salty bits like pretzels.
- Candy Corn Vodka Infusion - For the adults, place a handful of candy corn in a jar with vodka and let it infuse for a day or two. The candy will dissolve, leaving you with a sweet, seasonal spirit that’s great for cocktails.
- Homemade Gifts - Wrap up a bag of candy corn in a clear cellophane bag tied with festive ribbon. Perfect for charming party favors, Halloween treats, or thoughtful homemade gifts.
FAQs
The “secret ingredient” in this candy corn recipe is honey. While many store-bought versions rely only on sugar and corn syrup, adding honey gives our homemade candy corn its signature flavor and adds to its chewy texture.
Candy corn is made with just a handful of pantry staples. The five main ingredients are sugar, corn syrup, honey, butter (or another fat), and powdered sugar. Together, they create the signature chewy texture and sweet, nostalgic flavor we’re after. Food coloring and vanilla extract are usually added too, but these five basics form the foundation.
Generally speaking, yes—but you should always read your labels. This homemade version is gluten-free so long as you don't have any issues with cross-contamination.
Candy corn has a sweet, buttery vanilla flavor with subtle notes of honey and caramel. It’s rich and sugary, with a creamy finish that makes it taste a bit like a mix between frosting and toffee. That said, you're welcome to play around with the flavors of candy corn—hop up to the Variations section above for ideas.
If you tried this recipe and loved it, be sure to rate and review it below! For more inexpensive and delicious recipe inspiration, be sure to follow me on Pinterest. You can also get all of my newest content delivered straight to your inbox by signing up for my email newsletter!
Homemade Candy Corn with Honey
Equipment
Ingredients
- 1 ¼ C Powdered Sugar
- 6 ½ teaspoon Dry Milk Powder
- ½ teaspoon Kosher Salt
- ½ C Sugar
- 3 tablespoon Light Corn Syrup
- 2 ½ tablespoon Honey sub light corn syrup if vegan
- 2 ½ tablespoon Water
- 2 tablespoon Butter sub vegan butter if vegan
- ½ teaspoon Vanilla Extract
- 4-10 drops Gel Food Color colors of your choosing
Instructions
- In the bowl of a food processor fitted with the blade (or a blender if you don't have one), combine powdered sugar, dry milk powder and salt. Pulse to combine and cut milk powder into finer pieces, about 30 seconds. Set aside.1 ¼ C Powdered Sugar, 6 ½ teaspoon Dry Milk Powder, ½ teaspoon Kosher Salt
- In heavy bottomed saucepan, combine sugar, corn syrup, honey and water. Bring to a simmer and allow to cook for 4 minutes undisturbed.½ C Sugar, 3 tablespoon Light Corn Syrup, 2 ½ tablespoon Honey, 2 ½ tablespoon Water
- Clip candy thermometer to side of saucepan, ensuring the bulb isn't touching the bottom of the pan. Add butter and stir to combine. Cook until at least 235F and no more than 240F, then remove from heat. (See notes)2 tablespoon Butter
- Stir in vanilla and dry mixture with a silicone spatula until well combined. Pour out onto Silpat or parchment lined cookie sheet to cool. After about 15 minutes, the dough should be cool enough to handle.½ teaspoon Vanilla Extract
- Separate dough into 3 equal pieces. Color each piece (starting with 2-3 drops) of gel food coloring then knead to achieve desired and uniform color.4-10 drops Gel Food Color
- Separate each piece into two halves. Starting with one piece of each color, roll out into a long, thin strand, about ½" thick and 2' long. Stack the colors in the desired order, then gently smoosh (vertically) together all three pieces with your fingertips, being careful not to obscure the middle color.Using the palm of your hand, vigorously rub the top of the triad strand to flatten it and increase its sheen. Flip the piece over and repeat with your palm until mostly smooth.Repeat with other three strands.
- Using a bench scraper (or sharp knife) cut each strip into small triangles by alternating your tip left and right /. Continue until all pieces are formed.
- Allow to cool completely, then store in single layers separated by parchment in an airtight container for up to 10 days.Enjoy!
Notes
- Vegan Candy Corn - Simply sub in powdered coconut milk, vegan butter and extra corn syrup for the honey. If you go this route, try using dark corn syrup in addition to the light corn syrup for greater depth of flavor.
- Candy Corn Colors - By swapping the dye, you can easily make this a year-round treat. For Halloween candy corn that’s a little spookier, try black, green and orange instead of the traditional orange, yellow and white. Want to make some Christmas candy corn? Make it red, green and white. Easter candy corn? Pastel pink, blue and yellow would be cute. Valentine candy corn? Red and pink ought to do the trick. You’re also welcome to use all-natural dyes if you don’t want to use artificial food coloring.
- Customize Shapes - The candy dough can easily be molded however you like. If you prefer pumpkin candy corn, for example, you can either shape them by hand (great if you have a lot of kids to entertain 😅) or use a silicone pumpkin mold to knock out a bunch at once. Just roll the pieces into small balls, then press them with your thumb to fill the molds.
- Candy Corn Flavors - While the honey-vanilla combo is classic, you have plenty of options. Try replacing a few tablespoons of the powdered sugar with unsweetened cocoa powder for chocolate candy corn. Or, substitute the vanilla extract for other flavors like maple (great for Thanksgiving candy corn), lemon or strawberry (for spring), or mint (for Christmas). Note that other flavoring extracts are more potent than vanilla, so start with half as much, then adjust to taste.
- Make it work, regardless of your equipment. If you don't have a candy thermometer, you can still make candy corn, but you'll need a glass of water nearby to know when the mixture gets to soft ball stage.
- Keep kids safe. If you're making this with little ones, be sure to have them only observe and not touch during the simmering step. The caramelization of sugar creates something that I imagine is akin to napalm. If it gets on your skin, it will burn and slough off when you try to remove it. Trust me, I've done it.
- Soften the dough. Allowed the dough to cool too much before kneading and shaping? Not to worry! Simply microwave the candy corn dough in 10 second bursts until it is soft enough to work with.
- Room Temperature: Place the pieces in an airtight container and keep them at room temperature for 7–10 days. To prevent the candies from sticking together, line the container with parchment paper and store them in a single layer, adding additional sheets of parchment between each layer. Avoid refrigeration, as the extra moisture can affect the texture.
- Refrigeration & Freezing are not recommended, as the humidity can negatively impact the consistency.
Nutrition

Comments
No Comments